<?xml version="1.0" encoding="utf-8"?><feed xmlns="http://www.w3.org/2005/Atom" ><generator uri="https://jekyllrb.com/" version="3.10.0">Jekyll</generator><link href="https://alzobaer.github.io/feed.xml" rel="self" type="application/atom+xml" /><link href="https://alzobaer.github.io/" rel="alternate" type="text/html" /><updated>2026-07-21T16:50:13+00:00</updated><id>https://alzobaer.github.io/feed.xml</id><title type="html">AL Zobaer</title><subtitle>AL Zobaer — M2 researcher at the Mineno Laboratory, Shizuoka University: scale-invariant 3D plant phenotyping, 3D Gaussian Splatting, and autonomous agricultural robotics.</subtitle><author><name>AL Zobaer</name><email>zobaer.al.24@shizuoka.ac.jp</email></author><entry xml:lang="bn"><title type="html">বাস্তবে COLMAP</title><link href="https://alzobaer.github.io/bn/posts/2026/07/colmap-in-practice/" rel="alternate" type="text/html" title="বাস্তবে COLMAP" /><published>2026-07-22T09:00:00+00:00</published><updated>2026-07-22T09:00:00+00:00</updated><id>https://alzobaer.github.io/bn/posts/2026/07/colmap-in-practice-bn</id><content type="html" xml:base="https://alzobaer.github.io/bn/posts/2026/07/colmap-in-practice/"><![CDATA[<p><em>মূল ধারাবাহিক থেকে সরে এসে একটি লেখা, দুই ভাগে। প্রথম ভাগ কোনো পূর্বজ্ঞান
ধরে না নিয়েই বলে Structure-from-Motion আর COLMAP জিনিসটা কী; দ্বিতীয় ভাগ
হাতেকলমে খুঁটিনাটি, যাঁদের সত্যিই এটি চালাতে হয় তাঁদের জন্য। কেবল ধারণাটুকু
চাইলে “চারটি ধাপ” পর্যন্ত পড়ে থেমে যান। স্কেল ছাড়া মাপা নিয়ে প্রতিশ্রুত
লেখাটি এরপরেই আসছে।</em></p>

<h2 id="শুরু-করা-যাক-পর্যটকে-ভরা-একটি-চত্বর-দিয়ে">শুরু করা যাক পর্যটকে ভরা একটি চত্বর দিয়ে</h2>

<p>ব্যস্ত এক বিকেলে শহরের চত্বরে দাঁড়ানো একটি ভাস্কর্যের কথা ভাবুন। দুইশো মানুষ
তার ছবি তুলছে — সিঁড়ি থেকে, ক্যাফের বারান্দা থেকে, একেবারে কাছ থেকে, রাস্তার
ওপার থেকে। কেউ কারও সঙ্গে পরামর্শ করছে না। এরপর সেই দুইশো ছবিই এসে জমা হয়
একটিমাত্র ফোল্ডারে।</p>

<p>এবার বসে ছবিগুলো দেখতে থাকুন। কে কোথায় দাঁড়িয়ে ছিল, কেউ আপনাকে বলেনি। তবু
আপনি অবাক করার মতো অনেক কিছু বুঝে ফেলবেন। এটি বাঁ দিক থেকে তোলা। এটি উঁচু
থেকে, সম্ভবত সিঁড়ির উপর থেকে। এই দুটি প্রায় একই জায়গা থেকে। বুঝবেন কারণ
একই খুঁটিনাটি বারবার চোখে পড়ছে — পাথরের একটি ভাঙা কোণ, একটি ল্যাম্পপোস্ট,
মেঝের পাথরের নকশা — প্রতিটি ছবিতে ভিন্ন ভিন্ন জায়গায়।</p>

<p><strong>Structure-from-Motion হলো কম্পিউটারের ঠিক সেই কাজটিই করা — আপনাআপনি, এবং
আপনার চেয়ে বহুগুণ নিখুঁতভাবে।</strong> ফোল্ডারটি দিন, সে একসঙ্গে দুটি জিনিস
উদ্ধার করবে:</p>

<ul>
  <li><strong>প্রতিটি ছবি কোথা থেকে তোলা হয়েছিল</strong>, আর</li>
  <li><strong>সবাই যেদিকে তাক করেছিল, সেই বস্তুটির ত্রিমাত্রিক আকৃতি।</strong></li>
</ul>

<p>নামটিই পদ্ধতির বর্ণনা: ক্যামেরা এক শট থেকে পরের শটে সরে যাওয়ার (<em>motion</em>)
ভেতর দিয়ে আকৃতি (<em>structure</em>) উদ্ধার করা। এটি আদৌ কেন কাজ করে তা
<a href="/bn/posts/2026/07/how-a-computer-sees-a-plant-in-3d/">আগের লেখায়</a>
আছে; সংক্ষেপে, এটি সেই একই কৌশল যা আপনার দুই চোখ প্রতি মুহূর্তে খেলে যাচ্ছে।</p>

<p>এবার ভাস্কর্যের জায়গায় বসান একটি টমেটো গাছ, আর দুইশো পর্যটকের জায়গায়
একজন মানুষ, যে ফোন হাতে ধীরে তার চারপাশে একটি পাক দিচ্ছে। ওটাই আমার
দিনের কাজ, আর সমস্যাটি অবিকল একই।</p>

<h2 id="colmap-হলো-সেই-প্রোগ্রাম-যে-কাজটি-করে">COLMAP হলো সেই প্রোগ্রাম, যে কাজটি করে</h2>

<p><strong>COLMAP</strong> হলো সেই ওপেন-সোর্স সফটওয়্যার প্যাকেজ যা Structure-from-Motion
চালায়; Johannes Schönberger ও Jan-Michael Frahm-এর ২০১৬ সালের একটি
গবেষণাপত্রের সঙ্গে এটি প্রকাশিত হয়। প্রায় এক দশক ধরে এটিই স্বাভাবিক পছন্দ।
এটিই একমাত্র বিকল্প নয়, কিন্তু বাকি সবকিছু নিঃশব্দে ধরে নেয় আপনি এটিই
ব্যবহার করেছেন।</p>

<p>এটি একটিমাত্র বোতাম নয়। এটি গুটিকয় কমান্ড-লাইন ধাপ, যেগুলো ক্রমানুসারে
চালাতে হয়, আর প্রতিটি ধাপ তার ফল একটি সাঝা ডেটাবেস ফাইলে লিখে রাখে —
পরের ধাপ সেখান থেকেই তুলে নেয়।</p>

<p>এই ব্লগের জন্য এটি জরুরি, কারণ আমার জানা প্রতিটি 3D Gaussian Splatting
পাইপলাইন এখান থেকেই শুরু হয়।
<a href="/bn/posts/2026/07/what-is-a-gaussian-splat/">স্প্ল্যাটের লেখাটি</a>
যে বিন্দুমেঘকে কাঁচামাল ধরে নিয়েছিল, বাস্তবে সেটি COLMAP-এরই আউটপুট।
ক্যামেরার অবস্থানগুলোও তাই — আর সেগুলো ঠিক ততটাই জরুরি, কারণ স্প্ল্যাট
অপ্টিমাইজারকে জানতে হয় ছবিটি কোথা থেকে তোলা, তবেই সে নিজের আঁকা ছবির
সঙ্গে তাকে মেলাতে পারে।</p>

<h2 id="চারটি-ধাপ-সহজ-কথায়">চারটি ধাপ, সহজ কথায়</h2>

<figure>
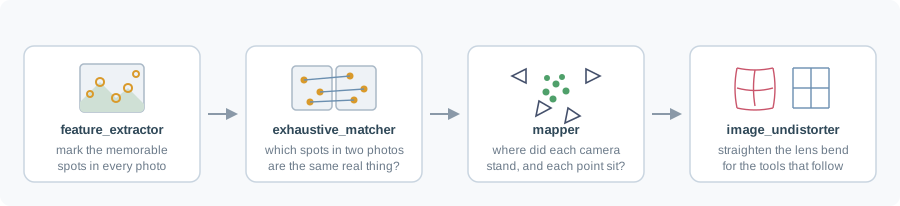
  <img src="/images/blog/colmap-stages.svg" alt="ক্রমানুসারে চারটি ধাপ: প্রতিটি ছবিতে চোখে পড়ার মতো জায়গাগুলো চিহ্নিত করা; দুটি ছবির কোন চিহ্নগুলো একই বাস্তব বস্তু তা ঠিক করা; কোন ক্যামেরা কোথায় ছিল আর কোন বিন্দু কোথায় বসে তা সমাধান করা; লেন্সের বাঁক সোজা করা।" />
  <figcaption>ক্রমানুসারে চারটি ধাপ। প্রথম দুটি কেবল ছবির দিকেই তাকায়;
  তৃতীয়টিতে এসে ত্রিমাত্রিক জ্যামিতি অবশেষে দেখা দেয়; আর চতুর্থটি পরের
  সরঞ্জামের জন্য গোছগাছ।</figcaption>
</figure>

<ol>
  <li><strong>চোখে পড়ার মতো জায়গা খুঁজে বের করা।</strong> প্রতিটি ছবিকে আলাদাভাবে দেখে সেই
জায়গাগুলো চিহ্নিত করা যেগুলো এতটাই স্বতন্ত্র যে পরে আবার চেনা যাবে — একটি
কোণ, একটি ছোপ, পাথরের ভাঙা অংশ। মসৃণ, ফাঁকা অঞ্চল থেকে কিছুই মেলে না।</li>
  <li><strong>মিলিয়ে নেওয়া।</strong> ছবি দুটি দুটি করে নিয়ে ঠিক করা, একটির কোন চিহ্নটি
অন্যটির কোন চিহ্নের সঙ্গে একই ভৌত বস্তু।</li>
  <li><strong>সমাধান করা।</strong> এমন হাজার হাজার মিল হাতে থাকলে, ক্যামেরা আর ত্রিমাত্রিক
বিন্দুগুলোর একটিমাত্র বিন্যাসই সেগুলোর সব ব্যাখ্যা করে। সেটিই বের করা।</li>
  <li><strong>গুছিয়ে দেওয়া।</strong> লেন্স সরলরেখাকে যেভাবে বাঁকায় তা সরিয়ে ছবিগুলো নতুন
করে লেখা, যাতে পরের সরঞ্জামগুলো একটি সরল, আদর্শ ক্যামেরা ধরে নিতে পারে।</li>
</ol>

<p>আনুষঙ্গিক হিসাবনিকাশ বাদ দিলে, সেটিই এই চারটি কমান্ড:</p>

<div class="language-bash highlighter-rouge"><div class="highlight"><pre class="highlight"><code>colmap feature_extractor <span class="se">\</span>
    <span class="nt">--database_path</span>  colmap/database.db <span class="se">\</span>
    <span class="nt">--image_path</span>     colmap/images <span class="se">\</span>
    <span class="nt">--ImageReader</span>.single_camera 1 <span class="se">\</span>
    <span class="nt">--FeatureExtraction</span>.use_gpu 1

colmap exhaustive_matcher <span class="se">\</span>
    <span class="nt">--database_path</span>  colmap/database.db <span class="se">\</span>
    <span class="nt">--FeatureMatching</span>.use_gpu 1

colmap mapper <span class="se">\</span>
    <span class="nt">--database_path</span>  colmap/database.db <span class="se">\</span>
    <span class="nt">--image_path</span>     colmap/images <span class="se">\</span>
    <span class="nt">--output_path</span>    colmap/sparse <span class="se">\</span>
    <span class="nt">--Mapper</span>.max_num_models<span class="o">=</span>1 <span class="se">\</span>
    <span class="nt">--Mapper</span>.init_min_tri_angle<span class="o">=</span>4 <span class="se">\</span>
    <span class="nt">--Mapper</span>.filter_min_tri_angle<span class="o">=</span>0.5

colmap image_undistorter <span class="se">\</span>
    <span class="nt">--image_path</span>     colmap/images <span class="se">\</span>
    <span class="nt">--input_path</span>     colmap/sparse/0 <span class="se">\</span>
    <span class="nt">--output_path</span>    colmap/undistorted
</code></pre></div></div>

<p>লেখার বাকিটা অপশন নিয়ে, কারণ মজার সিদ্ধান্তগুলো ওখানেই লুকিয়ে আছে।</p>

<h2 id="single_camera--যা-জানেন-তা-বলে-দিন"><code class="language-plaintext highlighter-rouge">single_camera</code> — যা জানেন, তা বলে দিন</h2>

<p>একটু চত্বরে ফিরি। দুইশো পর্যটক মানে দুইশোটি আলাদা ক্যামেরা আর ফোন, প্রতিটির
নিজস্ব লেন্স — আর কোন লেন্স ছবিটাকে কীভাবে বদলে দিচ্ছে, সেটা বের করাও এই
ধাঁধার অংশ। কিন্তু দুইশোটি ছবিই যদি <em>আপনি নিজে</em>, একটিমাত্র ফোনে তুলে থাকেন,
তবে বোঝার মতো লেন্স আছে একটিই — আর কথাটা স্পষ্ট করে বলে দিলেই বিপুল পরিমাণ
আন্দাজ করার কাজ বেঁচে যায়।</p>

<p>এই ফ্ল্যাগটি ঠিক তাই। <code class="language-plaintext highlighter-rouge">--ImageReader.single_camera 1</code> ঘোষণা করে যে সব ছবি
একই ভৌত ক্যামেরা থেকে, একই সেটিংসে এসেছে — অর্থাৎ তারা একই <strong>অন্তর্গত
প্যারামিটার</strong> ভাগ করে নেয়: ফোকাল দৈর্ঘ্য, মুখ্য বিন্দু, আর লেন্স বিকৃতি।</p>

<p>ফ্রেমগুলো যদি একটিমাত্র ভিডিও থেকে কাটা হয়, তবে কথাটি নিছক সত্য, আর সেটি
ঘোষণা করা মানে প্রায় বিনামূল্যে খানিকটা নির্ভুলতা পাওয়া। প্রতিটি ছবির জন্য
আলাদা করে ওই প্যারামিটারগুলো সমাধান করার বদলে, সলভার একটিমাত্র সেট অনুমান
করে — যাকে একসঙ্গে সব ছবি বাঁধন দিচ্ছে। অজানার সংখ্যা কমে, শর্তাবস্থা ভালো
হয়, ড্রিফট কমে।</p>

<p>উল্টো দিকটাও আছে: মাঝপথে যদি লেন্স বদলে থাকেন বা জুম করে থাকেন, তবে এই
ফ্ল্যাগটি একটি মিথ্যা, আর সে নিঃশব্দে আপনার পুনর্গঠনকে বাঁকিয়ে দেবে।
নিশ্চিত হয়ে নেওয়াই ভালো।</p>

<h2 id="মেলানো--যে-ধাপটি-সময়-খায়">মেলানো — যে ধাপটি সময় খায়</h2>

<p>ভাবুন, দুইশোটি ছবি আপনার হাতে দিয়ে বলা হলো — চত্বরের একই কোণ দেখা যাচ্ছে
এমন প্রতিটি জোড়া খুঁজে বের করুন। কেউ কোনো লেবেল লাগিয়ে দেয়নি। নিশ্চিত হওয়ার
একমাত্র উপায় হলো প্রতিটি ছবিকে বাকি প্রতিটির পাশে ধরে দেখা — আর সেটি বহু,
বহুবার ধরে দেখা।</p>

<p>এ কারণেই সময় যায় মেলানোতে, বৈশিষ্ট্য নিষ্কাশনে নয়। একটি ছবির ভেতরে চোখে
পড়ার মতো জায়গা খুঁজে বের করা দ্রুত, আর সবগুলো ছবির জন্য একসঙ্গেই করা যায়।
কিন্তু <em>কোন ছবির সঙ্গে কোন ছবির মিল আছে</em> — এই প্রশ্নের কোনো সস্তা উত্তর নেই।</p>

<figure>
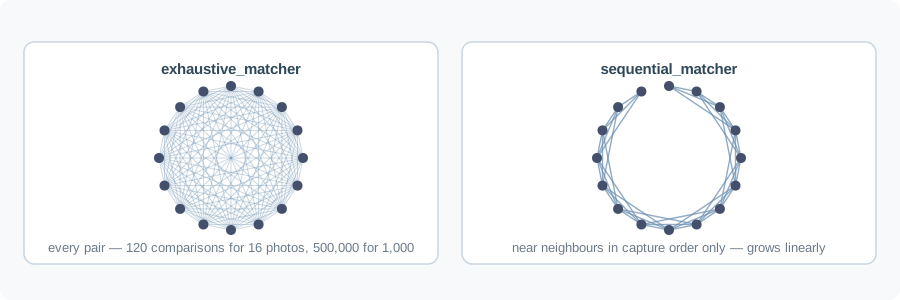
  <img src="/images/blog/matching-strategies.svg" alt="বৃত্তাকারে সাজানো ষোলোটি ছবি। বাঁয়ে সর্বজোড়া মেলানোতে প্রতিটি জোড়ার মধ্যে রেখা টানা, ফলে ঘন জট; ডানে ক্রমিক মেলানোতে প্রতিটি ছবি কেবল ধারণক্রমে কাছের ছবিগুলোর সঙ্গে যুক্ত, ফলে বৃত্তজুড়ে সরু একটি বলয়।" />
  <figcaption>সর্বজোড়া মেলানো প্রতিটি জোড়া মিলিয়ে দেখে — পুঙ্খানুপুঙ্খ,
  কিন্তু বর্গীয় হারে বাড়ে। ক্রমিক মেলানো এই সত্যটি কাজে লাগায় যে ভিডিওর
  ফ্রেম ক্রমানুসারে আসে, তাই প্রতিটি ফ্রেমকে কেবল সময়ে কাছের ফ্রেমগুলোর
  সঙ্গেই মেলায়।</figcaption>
</figure>

<p><code class="language-plaintext highlighter-rouge">exhaustive_matcher</code> প্রতিটি জোড়াই চেষ্টা করে। <em>N</em> সংখ্যক ছবির জন্য তা
<em>N(N−1)/2</em> বার তুলনা — ২০০ ছবিতে ঠিকঠাক, ১,০০০-এ অস্বস্তিকর, ৫,০০০-এ
অসম্ভব। আবার এটিই সবচেয়ে নিরাপদ বিকল্প, কারণ কোনো মিল তার চোখ এড়াতে পারে না।</p>

<p><code class="language-plaintext highlighter-rouge">sequential_matcher</code> ধরে নেয় ছবিগুলো ধারণক্রমে সাজানো — ভিডিও থেকে কাটা হলে
সত্যিই তাই — আর প্রতিটি ফ্রেমকে কেবল তার প্রতিবেশীদের একটি জানালার সঙ্গে মেলায়:</p>

<div class="language-bash highlighter-rouge"><div class="highlight"><pre class="highlight"><code>colmap sequential_matcher <span class="se">\</span>
    <span class="nt">--database_path</span> colmap/database.db <span class="se">\</span>
    <span class="nt">--SequentialMatching</span>.overlap 30 <span class="se">\</span>
    <span class="nt">--FeatureMatching</span>.use_gpu 1
</code></pre></div></div>

<p>আমি ফ্রেমসংখ্যা দেখে দুটির মধ্যে বেছে নিই — কয়েকশো পর্যন্ত সর্বজোড়া, তার
বেশি হলে ক্রমিক। ক্রমিক মেলানো সম্পর্কে জেনে রাখার বিষয়টি হলো, সে কেবল
সময়ে-সংলগ্ন জোড়াই দেখে। গাছের চারপাশে পুরো এক পাক ঘুরলে শেষ ফ্রেম আর প্রথম
ফ্রেম স্থানে মিলে যায়, কিন্তু ক্রমে বহু দূরে থাকে। ওই বৃত্তটি আর বন্ধ হয় না,
আর পুনর্গঠন পুরো পাক ঘুরে সরে যেতে পারে — টেনে জোড়া লাগানোর কিছুই থাকে না।
ঠিক এর জন্যই COLMAP-এ vocabulary tree দিয়ে লুপ শনাক্তকরণ আছে; চারপাশে ঘুরে
তোলা ধারণে ক্রমিক ব্যবহার করলে সেটি চালু করে নিন।</p>

<h2 id="mapper-আর-ত্রিভুজায়ন-কোণ">mapper, আর ত্রিভুজায়ন কোণ</h2>

<p>mapper-ই আসল Structure-from-Motion সলভার। সে প্রথমে একটি ভালো প্রাথমিক জোড়া
বাছে, সেই দুইয়ের মাঝে বিন্দু ত্রিভুজায়ন করে, তারপর বাকি ছবিগুলোকে একটি একটি
করে নথিভুক্ত করে — আর মাঝে মাঝে বান্ডল অ্যাডজাস্টমেন্ট চালিয়ে সবকিছুর
সঙ্গতি ধরে রাখে।</p>

<p>আমার দুটি অপশন <strong>ত্রিভুজায়ন কোণ</strong> নিয়ে। দৈনন্দিন ভাষায় ব্যাপারটা এই রকম।
আপনার দুই চোখ প্রায় ছয় সেন্টিমিটার দূরে বসানো, আর ওই ফাঁকটুকুই আপনাকে
দূরত্ব বুঝতে দেয়। এবার ভাবুন চোখ দুটি যদি মাত্র দুই মিলিমিটার দূরে থাকত।
দুই চোখেই ঘরটা দিব্যি দেখা যেত — কিন্তু দুটি দৃশ্য এতই কাছাকাছি হতো যে
কোনটা কাছে আর কোনটা দূরে, সে বোধ প্রায় থাকতই না।</p>

<p>দুটি দৃষ্টিকোণ যে বস্তুটির দিকে তাকিয়ে আছে, সেই বস্তুর কাছে তাদের মধ্যেকার
কোণটিই ত্রিভুজায়ন কোণ, আর মানেটা ঠিক এটাই: ছোট কোণ মানে গভীরতা নিয়ে
দুর্বল মতামত।</p>

<p>তাই <code class="language-plaintext highlighter-rouge">--Mapper.init_min_tri_angle=4</code> দাবি করে যে <em>প্রাথমিক</em> জোড়ার — যে দুটির
উপর COLMAP বাকি সব দাঁড় করাবে — দুই ক্যামেরার মধ্যে অন্তত চার ডিগ্রি থাকতে
হবে। প্রায় একই দৃষ্টিকোণের দুটি ছবি চমৎকারভাবে মিলে যেতে পারে, অথচ গভীরতা
নিয়ে প্রায় কিছুই বলে না: রশ্মি দুটি প্রায় সমান্তরাল, ফলে ছবিতে সামান্য
ভুলও ছেদবিন্দুটিকে অনেক দূরে সরিয়ে দেয়। সেখান থেকে শুরু করা মানেই এমন এক
পুনর্গঠন পাওয়া যা দেখতে বিশ্বাসযোগ্য, অথচ ভুল।</p>

<p><code class="language-plaintext highlighter-rouge">--Mapper.filter_min_tri_angle=0.5</code> একই ভাবনার পরবর্তী প্রয়োগ — যেসব বিন্দুর
পর্যবেক্ষণ সমান্তরালের এত কাছাকাছি যে ভরসা করা যায় না, সেগুলো বাদ দেওয়া।</p>

<p><code class="language-plaintext highlighter-rouge">--Mapper.max_num_models=1</code> অন্য ধরনের সিদ্ধান্ত। একটি জিগস পাজলের কথা ভাবুন,
যেখানে দুটি গুচ্ছ আলাদা আলাদা করে সুন্দর জোড়া লেগেছে, কিন্তু গুচ্ছ দুটিকে
জোড়ার কিছুই নেই — শেষ পর্যন্ত হাতে থাকল দুটি দ্বীপ, আর একে অন্যের সাপেক্ষে
কোথায় বসে তা জানার উপায় নেই। যে ছবিগুলোকে সে একটিমাত্র সঙ্গতিপূর্ণ দৃশ্যে
জুড়তে পারে না, সেগুলো দিলে COLMAP দিব্যি ঠিক তা-ই ধরিয়ে দেবে: দুটি বা
তিনটি আলাদা মডেল। এটি COLMAP-এর সততা — সংযোগগুলো সত্যিই ছিল না।
কিন্তু আমার কাজের জন্য টুকরো হয়ে যাওয়া ধারণ মানেই ব্যর্থ ধারণ, আর অর্ধেক
গাছ-ঢাকা স্প্ল্যাট হাতে পাওয়ার পরে জানার চেয়ে তখনই জেনে যাওয়া ভালো।</p>

<h2 id="গাছের-বেলায়-সে-কোথায়-হোঁচট-খায়">গাছের বেলায় সে কোথায় হোঁচট খায়</h2>

<p>উপরের পরামর্শ যেকোনো দৃশ্যের জন্যই খাটে। গাছ তার নিজস্ব সমস্যা যোগ করে, আর
সেগুলোর সবকটিই একটিমাত্র ধারণায় গিয়ে ঠেকে: <strong>Structure-from-Motion ধরে নেয়
দৃশ্যটি অনড় ও স্থির।</strong></p>

<p>চত্বরের ভাস্কর্যটি আদর্শ বিষয়বস্তু ঠিক এই কারণেই যে সে নড়ে না। এবার ভাবুন
পর্যটকেরা এমন কিছুর ছবি তুলছে যা মোটেই সহযোগিতা করছে না — বাজারের ব্যস্ত
একটি দোকান, যেখানে এক ছবি আর পরের ছবির মাঝে ক্রেটগুলো নতুন করে সাজানো
হয়েছে আর অর্ধেক মালামাল বিক্রি হয়ে গেছে। দুটি ছবিতে “একই জিনিস” চেনার
মানেটাই বদলে যায়, আর পুরো পদ্ধতিটি নিজের সঙ্গেই লড়তে শুরু করে।</p>

<p>গাছ হলো সেই বাজারের দোকানেরই নরম একটি সংস্করণ।</p>

<p><strong>পাতা নড়ে।</strong> গ্রিনহাউসে ভেন্টিলেশন ফ্যান আছে, বাতাসের স্রোত আছে, আর আছে
এত হালকা পাতা যে দুটোতেই সাড়া দেয়। কয়েক সেকেন্ড ব্যবধানের দুটি ফ্রেমের
মাঝে পাতাটি আকার বদলে ফেলেছে। ওই মিলটি এখন দৃশ্যের প্রতিটি স্থির বিন্দুর
সঙ্গে জ্যামিতিকভাবে অসঙ্গত, আর সমাধানে সে ঢোকে বহিঃস্থ মান হিসেবে। RANSAC
কিছুটা শুষে নেয়। মাত্রা ছাড়ালে নথিভুক্তি স্রেফ ব্যর্থ হয়। বাস্তব উত্তরটি
নিতান্ত সাদামাটা: দ্রুত ধারণ করুন, আর ফ্যান বন্ধ থাকতে ধারণ করুন।</p>

<p><strong>পাতা বৈশিষ্ট্য হিসেবে দুর্বল।</strong> মসৃণ ঢালের, চিহ্নহীন সবুজ তল থেকে খুব কম
কি-পয়েন্ট মেলে। COLMAP বরং আঁকড়ে ধরে মাটির বুনট, টবের কিনারা, গাছের লেবেল,
বেঞ্চের ধার আর গ্রিনহাউসের এলোমেলো জিনিসপত্র। ক্যামেরার অবস্থান বের করতে
সাধারণত এটুকুই যথেষ্ট — আর আপনার দরকার তো সেটাই — তবে <em>গাছের উপরে</em> বিন্দুমেঘ
প্রায়ই নতুনদের প্রত্যাশার চেয়ে অনেক পাতলা হয়। ফসলের উপর কম বিন্দু থাকা
মানেই ব্যর্থতা নয়।</p>

<p><strong>গ্রিনহাউস নিজেকেই বারবার ফিরিয়ে আনে।</strong> একই রকম টব, একই ট্রে, সমান দূরত্বের
বেঞ্চ, পুনরাবৃত্ত কাঠামো। পুনরাবৃত্ত গঠনই আত্মবিশ্বাসী ভুল-মিল পাওয়ার
চিরায়ত উপায়, আর আত্মবিশ্বাসী ভুল-মিল এমন পুনর্গঠন বানায় যা স্থানীয়ভাবে
পরিচ্ছন্ন আর সামগ্রিকভাবে ভাঁজ খাওয়া।</p>

<p><strong>কাচ আর আকাশ।</strong> গ্রিনহাউসের কাচ ভেদ করে আসা পেছনের আলো পাতার সূক্ষ্মতা
ধুইয়ে দেয় আর অটো-এক্সপোজারকে ফ্রেমে ফ্রেমে দোলায়। ঝলমলে প্রতিফলন ক্যামেরার
সঙ্গে সঙ্গে সরে — অর্থাৎ সেগুলো এমন বৈশিষ্ট্য যা গঠনগতভাবেই স্থির-দৃশ্যের
ধারণা ভাঙে।</p>

<h2 id="ফলাফল-পড়া">ফলাফল পড়া</h2>

<p>স্প্ল্যাটিং-এ GPU-ঘণ্টা ঢালার আগে তিনটি জিনিস দেখে নিন।</p>

<p>প্রথমত, <strong>কতগুলো ছবি নথিভুক্ত হলো</strong>। mapper সেটি জানায়। ৬০০ ফ্রেম দিয়ে যদি
৩৪০টি নথিভুক্ত হয়, তবে আপনি যে ধারণটি হাতে আছে ভাবছেন সেটি আসলে নেই — আর
বাদ পড়া ২৬০টি সাধারণত পরপর থাকে; ঠিক সেখানেই ঘরের ভেতর কিছু একটা গড়বড়
হয়েছিল।</p>

<p>দ্বিতীয়ত, <strong>কয়টি মডেল বেরোলো</strong>। একটির বেশি মানে দৃশ্যটি জোড়া লাগেনি।</p>

<p>তৃতীয়ত, <strong>বিন্দুমেঘটি চোখে দেখুন</strong>। নিয়মরক্ষার জন্য নয়: খুলে দেখুন আকৃতিটি
গাছের মতো লাগছে কি না। ভাঁজ খাওয়া বা দ্বিগুণ হয়ে যাওয়া পুনর্গঠন তিন সেকেন্ড
তাকালেই ধরা পড়ে, আর লগ-এ কখনোই ধরা পড়ে না।</p>

<h2 id="দুটি-ব্যবহারিক-টুকিটাকি">দুটি ব্যবহারিক টুকিটাকি</h2>

<p>বিল্ড গুরুত্বপূর্ণ। আপনার ডিস্ট্রিবিউশনের প্যাকেজ ম্যানেজারের COLMAP হয়তো
CUDA ছাড়াই কম্পাইল করা, আর তখন উপরের GPU ফ্ল্যাগগুলো হয় কিছুই করে না, নয়তো
সরাসরি ব্যর্থ হয়। এ কারণেই আমি সিস্টেমেরটার পাশাপাশি একটি CUDA-সক্ষম বিল্ড
আলাদা করে রাখি।</p>

<p>আর হেডলেস মেশিনে COLMAP একটি OpenGL কনটেক্সট বানাতে গিয়ে ক্র্যাশ করবে।
<code class="language-plaintext highlighter-rouge">export QT_QPA_PLATFORM=offscreen</code> দিলে ঠিক হয়ে যায়। একবার এতে আমার একটি
বিকেল গেছে, আর এররটি এমন কোথাও ইশারা করে না যা কাজে লাগে।</p>

<h2 id="শেষে-হাতে-যা-থাকে">শেষে হাতে যা থাকে</h2>

<p>নথিভুক্ত প্রতিটি ছবির ক্যামেরা-অবস্থান, একটি বিন্দুমেঘ, আর বিকৃতিমুক্ত ছবি —
স্প্ল্যাট অপ্টিমাইজার শুরু করতে যা যা লাগে, সব।</p>

<p>যা থাকে না তা হলো গাছটি ঠিক কত বড়, তার কোনো ধারণা। COLMAP জ্যামিতির ব্যাপারে
সূক্ষ্মদর্শী আর স্কেলের ব্যাপারে নীরব — কারণটি
<a href="/bn/posts/2026/07/how-a-computer-sees-a-plant-in-3d/">আগের লেখাতেই</a>
বলা: এই পুরো প্রক্রিয়ার কোথাও কোনো ছবিকে কোনো স্কেলের সঙ্গে মেলানো হয়নি।</p>

<hr />

<p><em>পরের পর্বে মূল ধারাবাহিকে ফিরছি: স্কেল একবারও ঠিক না করে গাছের বৈশিষ্ট্য মাপা যায় কীভাবে।</em></p>]]></content><author><name>AL Zobaer</name><email>zobaer.al.24@shizuoka.ac.jp</email></author><category term="3d-reconstruction" /><category term="colmap" /><category term="tools" /><category term="phenotyping" /><summary type="html"><![CDATA[দুইশো পর্যটক একটি ভাস্কর্যের ছবি তোলে, আর কেবল সেই ছবিগুলো দেখেই বলে দেওয়া যায় কে কোথায় দাঁড়িয়ে ছিল। এটাই Structure-from-Motion, আর COLMAP হলো সেই প্রোগ্রাম যা কাজটি করে — একেবারে গোড়া থেকে, তারপর হাতেকলমে।]]></summary></entry><entry xml:lang="ja"><title type="html">実務としての COLMAP</title><link href="https://alzobaer.github.io/ja/posts/2026/07/colmap-in-practice/" rel="alternate" type="text/html" title="実務としての COLMAP" /><published>2026-07-22T09:00:00+00:00</published><updated>2026-07-22T09:00:00+00:00</updated><id>https://alzobaer.github.io/ja/posts/2026/07/colmap-in-practice-ja</id><content type="html" xml:base="https://alzobaer.github.io/ja/posts/2026/07/colmap-in-practice/"><![CDATA[<p><em>本編からの寄り道、二部構成です。前半は Structure-from-Motion と COLMAP が
何であるかを、予備知識なしで説明します。後半は実務の細部 — 実際に自分で
動かす必要がある人のために。考え方だけ知りたい方は「四つの工程」まで読んで
やめてください。予告した「スケールなしで測る」記事は、この次に書きます。</em></p>

<h2 id="観光客でいっぱいの広場から">観光客でいっぱいの広場から</h2>

<p>にぎやかな午後の、街の広場に立つ彫像を思い浮かべてください。二百人が
それを撮ります — 階段の上から、カフェのテラスから、間近から、通りの
向かい側から。誰も打ち合わせなどしていません。そのあと、二百枚すべてが
ひとつのフォルダに集まります。</p>

<p>さあ、腰を据えてその写真を見ていきましょう。誰がどこに立っていたかは
一切知らされていない。それでも、驚くほど多くのことが分かります。これは
左から撮ったもの。これは高い位置、たぶん階段の上から。この二枚はほとんど
同じ場所から。なぜ分かるかといえば、同じ細部 — 石の欠け、街灯、敷石の模様 —
が、写真ごとに違う位置に繰り返し現れるからです。</p>

<p><strong>Structure-from-Motion とは、まさにそれを、自動で、しかも人間よりはるかに
正確にやる技術です。</strong> フォルダを渡せば、二つのことを同時に復元します。</p>

<ul>
  <li><strong>どの写真がどこから撮られたか</strong>、そして</li>
  <li><strong>全員が向けていた対象の、三次元の形</strong>。</li>
</ul>

<p>名前がそのまま方法の説明になっています — カメラがショットからショットへ
動くこと（<em>motion</em>）から、形（<em>structure</em>）を復元する。なぜそんなことが
できるのかは
<a href="/ja/posts/2026/07/how-a-computer-sees-a-plant-in-3d/">以前の記事</a>
に書きました。要するに、あなたの両目が毎秒やっているのと同じ手品です。</p>

<p>さて、彫像をトマトの株に、二百人の観光客をスマートフォン片手にゆっくり
一周する一人に置き換えてください。それが私の一日の仕事で、問題はまったく
同じものです。</p>

<h2 id="colmap-はそれを行うプログラム">COLMAP は、それを行うプログラム</h2>

<p><strong>COLMAP</strong> は Structure-from-Motion を実行するオープンソースのソフトウェア
パッケージで、Johannes Schönberger と Jan-Michael Frahm による2016年の論文と
ともに公開されました。以来およそ十年、既定の選択肢であり続けています。
唯一の選択肢ではありませんが、他のすべてが「これを使ったはずだ」と
黙って前提にしている選択肢です。</p>

<p>ボタン一つではありません。順番に実行するいくつかのコマンドライン工程の
集まりで、各工程は結果を共有のデータベースファイルに書き込み、次の工程が
それを拾います。</p>

<p>このブログにとって重要なのは、私の知るかぎり 3D Gaussian Splatting の
パイプラインがどれもここから始まるからです。
<a href="/ja/posts/2026/07/what-is-a-gaussian-splat/">スプラットの記事</a>
が素材として扱った点群は、実務上は COLMAP の出力です。カメラ位置も同じで、
そしてこちらも同じくらい重要です — スプラットの最適化は、その写真が
どこから撮られたかを知らなければ、自分の描画と比べることすらできません。</p>

<h2 id="四つの工程を平たい言葉で">四つの工程を、平たい言葉で</h2>

<figure>
  <img src="/images/blog/colmap-stages.svg" alt="順に四つの工程：各写真の中で目印になる箇所に印をつける、二枚の写真の印が同じ実体かどうかを判定する、各カメラの位置と各点の位置を解く、レンズの歪みをまっすぐに直す。" />
  <figcaption>順に実行する四工程。最初の二つは写真だけを見ています。
  三つ目で初めて三次元の幾何が現れ、四つ目は次に来るツールのための
  後片付けです。</figcaption>
</figure>

<ol>
  <li><strong>目印になる箇所を見つける。</strong> 各写真を単独で眺め、あとで見分けがつくほど
特徴的な場所に印をつける — 角、斑点、石の欠け。のっぺりした一様な領域には
何も付きません。</li>
  <li><strong>突き合わせる。</strong> 写真を二枚ずつ取り、一方の印のどれが他方の印のどれと
同じ実体なのかを判定する。</li>
  <li><strong>解く。</strong> そうした対応が何千と与えられたとき、そのすべてを説明できる
カメラと3次元点の配置は一通りしかない。それを求める。</li>
  <li><strong>整える。</strong> レンズによる直線の曲がりを取り除いて写真を書き直し、
下流のツールが単純で理想的なカメラを仮定できるようにする。</li>
</ol>

<p>雑事を取り除けば、それがこの四つのコマンドです。</p>

<div class="language-bash highlighter-rouge"><div class="highlight"><pre class="highlight"><code>colmap feature_extractor <span class="se">\</span>
    <span class="nt">--database_path</span>  colmap/database.db <span class="se">\</span>
    <span class="nt">--image_path</span>     colmap/images <span class="se">\</span>
    <span class="nt">--ImageReader</span>.single_camera 1 <span class="se">\</span>
    <span class="nt">--FeatureExtraction</span>.use_gpu 1

colmap exhaustive_matcher <span class="se">\</span>
    <span class="nt">--database_path</span>  colmap/database.db <span class="se">\</span>
    <span class="nt">--FeatureMatching</span>.use_gpu 1

colmap mapper <span class="se">\</span>
    <span class="nt">--database_path</span>  colmap/database.db <span class="se">\</span>
    <span class="nt">--image_path</span>     colmap/images <span class="se">\</span>
    <span class="nt">--output_path</span>    colmap/sparse <span class="se">\</span>
    <span class="nt">--Mapper</span>.max_num_models<span class="o">=</span>1 <span class="se">\</span>
    <span class="nt">--Mapper</span>.init_min_tri_angle<span class="o">=</span>4 <span class="se">\</span>
    <span class="nt">--Mapper</span>.filter_min_tri_angle<span class="o">=</span>0.5

colmap image_undistorter <span class="se">\</span>
    <span class="nt">--image_path</span>     colmap/images <span class="se">\</span>
    <span class="nt">--input_path</span>     colmap/sparse/0 <span class="se">\</span>
    <span class="nt">--output_path</span>    colmap/undistorted
</code></pre></div></div>

<p>この記事の残りはオプションの話です。面白い判断は、そちら側にあるからです。</p>

<h2 id="single_camera--分かっていることは伝える"><code class="language-plaintext highlighter-rouge">single_camera</code> — 分かっていることは伝える</h2>

<p>少しだけ広場に戻ります。二百人の観光客がいるということは、二百台の
カメラやスマートフォンがあり、それぞれ別のレンズがあるということです。
そして「どのレンズが写真をどう歪めるか」を割り出すのも、この謎解きの一部
なのです。ところが二百枚すべてを<em>あなた自身が</em>一台のスマートフォンで
撮ったのなら、割り出すべきレンズはひとつしかない — そしてそう明言して
おくだけで、膨大な推測が省けます。</p>

<p>このフラグはそれです。<code class="language-plaintext highlighter-rouge">--ImageReader.single_camera 1</code> は、すべての画像が
同一のカメラから同一の設定で得られたと宣言します。つまり<strong>内部パラメータ</strong>
（焦点距離、主点、レンズ歪み）を共有する、ということです。</p>

<p>フレームを一本の動画から切り出したのなら、これは端的に事実であり、宣言する
だけでほぼ無償の精度が手に入ります。画像ごとに内部パラメータを解く代わりに、
すべての画像から拘束を受けた一組を推定することになる。未知数は減り、
条件は良くなり、ドリフトも減ります。</p>

<p>裏を返せば、途中でレンズを替えたりズームしたりしていれば、このフラグは嘘に
なり、復元を静かに歪めます。確かめておく価値はあります。</p>

<h2 id="マッチング--時間を食う工程">マッチング — 時間を食う工程</h2>

<p>二百枚の写真を手渡され、「広場の同じ隅が写っている組をすべて挙げよ」と
言われたと想像してください。ラベルなど誰も貼っていません。確実にやるには、
一枚を残り全部と突き合わせるしかない — そしてそれは、途方もない回数の
突き合わせです。</p>

<p>だから時間を食うのは特徴抽出ではなくマッチングなのです。一枚の写真の中から
目印を見つけるのは速く、全部まとめて処理できます。しかし<em>どの写真とどの写真が
重なっているか</em>という問いには、安上がりな答えがありません。</p>

<figure>
  <img src="/images/blog/matching-strategies.svg" alt="16枚の写真を輪に並べた図。左は総当たりマッチングで、すべての組に線が引かれ密な網になっている。右は逐次マッチングで、撮影順に近いものどうしだけが結ばれ、輪に沿った細い帯になっている。" />
  <figcaption>総当たりマッチングはすべての組を比べます。徹底的ですが、
  計算量は二乗で増える。逐次マッチングは動画のフレームが順番に並んでいる
  という事実を使い、時間的に近いものだけを比べます。</figcaption>
</figure>

<p><code class="language-plaintext highlighter-rouge">exhaustive_matcher</code> はすべての組を試します。画像が <em>N</em> 枚なら
<em>N(N−1)/2</em> 回の比較 — 200枚なら問題なく、1,000枚なら不快で、5,000枚では
お手上げです。同時に、重なりを見落とすことがないという意味では、
もっとも安全な選択でもあります。</p>

<p><code class="language-plaintext highlighter-rouge">sequential_matcher</code> は画像が撮影順に並んでいると仮定し（動画から切り出した
なら実際そうです）、各フレームを近傍の窓の中とだけ照合します。</p>

<div class="language-bash highlighter-rouge"><div class="highlight"><pre class="highlight"><code>colmap sequential_matcher <span class="se">\</span>
    <span class="nt">--database_path</span> colmap/database.db <span class="se">\</span>
    <span class="nt">--SequentialMatching</span>.overlap 30 <span class="se">\</span>
    <span class="nt">--FeatureMatching</span>.use_gpu 1
</code></pre></div></div>

<p>私はフレーム数で使い分けています — 数百枚までは総当たり、それ以上は逐次。
逐次マッチングについて知っておくべきなのは、時間的に隣り合う組しか見ない、
ということです。植物のまわりを一周すると、最後のフレームと最初のフレームは
空間的には重なっているのに、並びの上では遠く離れています。そのループは
閉じられず、復元は一周ぶんずれたまま、それを引き戻すものが何もない。
COLMAP にはまさにこのための vocabulary tree によるループ検出があります。
一周する撮影で逐次を使うなら、必ず有効にしてください。</p>

<h2 id="mapper-と三角測量角">mapper と、三角測量角</h2>

<p>mapper が実際の Structure-from-Motion のソルバです。まず良い初期ペアを選び、
その二枚の間で点を三角測量し、残りの画像を一枚ずつ登録しながら、
折を見てバンドル調整をかけ直して全体の整合を保ちます。</p>

<p>私のオプションのうち二つは<strong>三角測量角</strong>に関するものです。日常の言葉で言えば
こういうことです。あなたの両目は約6センチメートル離れていて、その隔たりが
距離感を生んでいます。では、もし両目が2ミリしか離れていなかったら。部屋は
どちらの目にもちゃんと見えます — けれども二つの像があまりに似通っていて、
何が近くて何が遠いかの感覚はほとんど失われるでしょう。</p>

<p>二つの視点が、共に見ている対象の位置でなす角。それが三角測量角であり、
意味はまさにこれです — 角が小さいとは、奥行きについての意見が弱いということ。</p>

<p>だから <code class="language-plaintext highlighter-rouge">--Mapper.init_min_tri_angle=4</code> は、<em>初期</em>ペア — COLMAP が他のすべてを
その上に積み上げる二枚 — のカメラ間に最低4度を要求します。ほとんど同じ視点の
二枚は、見事に対応がついても、奥行きについてはほとんど何も語りません。
光線がほぼ平行なので、画像上のわずかな誤差が交点を遠くまで滑らせてしまう。
そこから始めるというのは、もっともらしく見えて実は間違っている復元を得る
ための方法です。</p>

<p><code class="language-plaintext highlighter-rouge">--Mapper.filter_min_tri_angle=0.5</code> は同じ考えを事後に適用し、観測が平行に
近すぎて信用できない点を捨てます。</p>

<p><code class="language-plaintext highlighter-rouge">--Mapper.max_num_models=1</code> は種類の違う判断です。ジグソーパズルを思って
ください。二つの塊がそれぞれ綺麗に組み上がったのに、その二つをつなぐ
ピースがない — 島が二つできて、互いの位置関係は分からないまま。ひとつの
整合した場面につなげられない写真群を渡されると、COLMAP は平気でまさに
それを、つまり二つも三つも別々のモデルを出してきます。それは COLMAP の誠実さです — つながりが実際になかったのだから。
しかし私の目的にとって、断片化した撮影は失敗した撮影であり、
半分しか写っていないスプラットになってから気づくより、
その場で分かったほうがいい。</p>

<h2 id="植物で失敗するところ">植物で失敗するところ</h2>

<p>ここまでの助言はどんな場面にも当てはまります。植物は固有の問題を加えます。
そしてそのすべてが、ひとつの前提に行き着く —
<strong>Structure-from-Motion は、場面が剛体で静止していることを前提とする。</strong></p>

<p>広場の彫像が理想的な被写体なのは、まさにそれが動かないからです。では観光客が
もっと非協力的なもの — 忙しい市場の露店 — を撮っていたら。一枚と次の一枚の
あいだに木箱は積み直され、商品の半分は売れてしまっている。二枚の写真の中で
「同じもの」を見分けるという営みが、それまでとは違う意味になってしまい、
手法そのものが自分と喧嘩を始めます。</p>

<p>植物とは、その露店の穏やかな版です。</p>

<p><strong>葉は動く。</strong> 温室には換気扇があり、気流があり、そのどちらにも反応するほど
軽い葉があります。数秒離れた二枚のフレームの間で、葉はもう形を変えている。
その対応づけは場面の静止点すべてと幾何的に矛盾し、外れ値として解に入ります。
RANSAC がある程度は吸収します。度を越せば、登録は単純に失敗する。
現実的な答えは色気のないものです — 速く撮る。そして扇風機が止まっているときに撮る。</p>

<p><strong>葉は特徴として不利。</strong> なめらかな階調で目印の少ない緑の面からは、
キーポイントがあまり取れません。COLMAP が代わりに掴むのは、土の質感、
鉢の縁、植物ラベル、ベンチの端、温室の雑多なものです。カメラ位置を解くには
たいていこれで十分で — 実際に必要なのはそちらです — ただし疎な点群は
<em>植物の上では</em>、初めての人が予想するよりずっと薄いことが多い。
作物の上の点が少ないことは、必ずしも失敗ではありません。</p>

<p><strong>温室は自分自身を反復する。</strong> 同じ鉢、同じトレイ、等間隔のベンチ、
繰り返す構造材。反復構造は、自信たっぷりの誤対応を生む古典的な原因であり、
自信たっぷりの誤対応は、局所的には綺麗で大域的には折れ畳まれた復元を作ります。</p>

<p><strong>ガラスと空。</strong> 温室の被覆越しの逆光は葉のディテールを白飛びさせ、
自動露出をフレーム間で揺らします。鏡面ハイライトはカメラとともに動く —
つまり、その定義からして静止場面の前提を破る特徴です。</p>

<h2 id="結果を読む">結果を読む</h2>

<p>スプラッティングにGPU時間を注ぎ込む前に、三つ確認します。</p>

<p>第一に、<strong>何枚が登録されたか</strong>。mapper が報告します。600フレーム渡して340枚
しか登録されていないなら、思っているような撮影データは手元にありません。
そして欠けた260枚はたいてい連続しています — そこが、現場で何かが起きた場所です。</p>

<p>第二に、<strong>モデルがいくつ出たか</strong>。二つ以上なら、場面はつながらなかった。</p>

<p>第三に、<strong>疎な点群を実際に見る</strong>。形式的にではなく、開いて、その形が植物に
見えるかを確かめる。折れたり二重になったりした復元は、三秒眺めれば明らかで、
ログの上では見えません。</p>

<h2 id="運用上の二点">運用上の二点</h2>

<p>ビルドが効きます。ディストリビューションのパッケージに入っている COLMAP は
CUDA なしでコンパイルされていることがあり、その場合上のGPUオプションは
何もしないか、そのまま落ちます。私がシステムのものとは別に CUDA 有効の
ビルドを置いているのはこのためです。</p>

<p>そしてヘッドレスの機械では、COLMAP は OpenGL コンテキストを作ろうとして
クラッシュします。<code class="language-plaintext highlighter-rouge">export QT_QPA_PLATFORM=offscreen</code> で直ります。
これで午後を一度潰しましたし、エラーメッセージは何の役にも立ちません。</p>

<h2 id="最後に手元に残るもの">最後に手元に残るもの</h2>

<p>登録されたすべての画像のカメラ位置、疎な点群、そして歪み補正済みの画像 —
スプラットの最適化を始めるのに必要なものは、すべて揃います。</p>

<p>揃わないのは、その植物がどれだけ大きいかという情報です。COLMAP は幾何に
ついては几帳面で、スケールについては沈黙します。理由は
<a href="/ja/posts/2026/07/how-a-computer-sees-a-plant-in-3d/">以前の記事</a>
で述べたとおり — この過程のどこにも、写真を物差しと比べる場面がないからです。</p>

<hr />

<p><em>次は本編に戻ります：スケールを一度も確定させずに、植物の形質を測る方法。</em></p>]]></content><author><name>AL Zobaer</name><email>zobaer.al.24@shizuoka.ac.jp</email></author><category term="3d-reconstruction" /><category term="colmap" /><category term="tools" /><category term="phenotyping" /><summary type="html"><![CDATA[二百人の観光客が彫像を撮る。その写真だけから、誰がどこに立っていたかを言い当てられる。それが Structure-from-Motion であり、COLMAP はそれを行うプログラムです。ゼロから説明し、そのあと実務の話へ。]]></summary></entry><entry xml:lang="en"><title type="html">COLMAP in practice</title><link href="https://alzobaer.github.io/posts/2026/07/colmap-in-practice/" rel="alternate" type="text/html" title="COLMAP in practice" /><published>2026-07-22T09:00:00+00:00</published><updated>2026-07-22T09:00:00+00:00</updated><id>https://alzobaer.github.io/posts/2026/07/colmap-in-practice</id><content type="html" xml:base="https://alzobaer.github.io/posts/2026/07/colmap-in-practice/"><![CDATA[<p><em>An aside from the main series, in two halves. The first explains what
Structure-from-Motion and COLMAP are, assuming nothing; the second is the
practical detail, for anyone who has to actually run the thing. If you only want
the idea, stop after the four steps. The promised post on measuring without
scale is still coming.</em></p>

<h2 id="start-with-a-square-full-of-tourists">Start with a square full of tourists</h2>

<p>Picture a statue in a city square on a busy afternoon. Two hundred people
photograph it — from the steps, from the café terrace, close up, from across the
road. Nobody coordinates with anybody. Afterwards, every one of those
photographs ends up in a single folder.</p>

<p>Now sit down and look through them. Nobody has told you anything about who stood
where, and yet you can work a surprising amount out. This one was taken from the
left. This one from higher up, probably from the steps. These two were taken
almost from the same spot. You know it because you keep recognising the same
details — a chip in the stone, a lamp post, the pattern of the paving — turning
up in different places in different photographs.</p>

<p><strong>Structure-from-Motion is a computer doing exactly that, automatically and far
more precisely than you can.</strong> Give it the folder and it recovers two things at
the same time:</p>

<ul>
  <li><strong>where every photograph was taken from</strong>, and</li>
  <li><strong>the three-dimensional shape of the thing everyone was pointing at.</strong></li>
</ul>

<p>The name is a description of the method: it recovers <em>structure</em> — the shape —
from <em>motion</em>, the camera moving between one shot and the next. The
<a href="/posts/2026/07/how-a-computer-sees-a-plant-in-3d/">earlier post</a>
explains why this works at all; the short version is that it is the same trick
your two eyes play on you every second of the day.</p>

<p>Now swap the statue for a tomato plant, and the two hundred tourists for one
person walking a slow circle around it with a phone. That is my working day, and
the problem is identical.</p>

<h2 id="colmap-is-the-program-that-does-it">COLMAP is the program that does it</h2>

<p><strong>COLMAP</strong> is the open-source software package that performs
Structure-from-Motion, released alongside a 2016 paper by Johannes Schönberger
and Jan-Michael Frahm. It has been the default choice for about a decade. It is
not the only option, but it is the one that everything else quietly assumes you
used.</p>

<p>It is not a single button. It is a handful of command-line steps that you run in
order, each writing its results into a shared database file for the next step to
pick up.</p>

<p>It matters for this blog because every 3D Gaussian Splatting pipeline I know of
begins here. The point cloud that the
<a href="/posts/2026/07/what-is-a-gaussian-splat/">splatting post</a>
treated as its raw material is, in practice, COLMAP output. So are the camera
positions — and those matter just as much, because the splat optimiser has to
know where a photograph was taken from before it can compare its own render
against it.</p>

<h2 id="the-four-steps-in-plain-words">The four steps, in plain words</h2>

<figure>
  <img src="/images/blog/colmap-stages.svg" alt="Four stages in order: mark the memorable spots in every photo; decide which spots in two photos are the same real thing; solve for where each camera stood and each point sits; straighten the lens bend." />
  <figcaption>Four steps, run in order. The first two look only at photographs;
  the third is where three-dimensional geometry finally appears; the fourth is
  housekeeping for whatever tool comes next.</figcaption>
</figure>

<ol>
  <li><strong>Find the memorable spots.</strong> Go through each photograph on its own and mark
the places distinctive enough to be recognised again — a corner, a speckle, a
chip in the stone. Smooth, blank regions get nothing.</li>
  <li><strong>Match them up.</strong> Take photographs two at a time and decide which marked
spots in one are the same physical thing as which marked spots in the other.</li>
  <li><strong>Solve.</strong> Given thousands of these correspondences, work out the only
arrangement of cameras and 3D points that explains them all.</li>
  <li><strong>Tidy up.</strong> Rewrite the photographs to remove the lens’s bending of straight
lines, so the tools downstream can assume a simple, idealised camera.</li>
</ol>

<p>Stripped of the bookkeeping, that is these four commands:</p>

<div class="language-bash highlighter-rouge"><div class="highlight"><pre class="highlight"><code>colmap feature_extractor <span class="se">\</span>
    <span class="nt">--database_path</span>  colmap/database.db <span class="se">\</span>
    <span class="nt">--image_path</span>     colmap/images <span class="se">\</span>
    <span class="nt">--ImageReader</span>.single_camera 1 <span class="se">\</span>
    <span class="nt">--FeatureExtraction</span>.use_gpu 1

colmap exhaustive_matcher <span class="se">\</span>
    <span class="nt">--database_path</span>  colmap/database.db <span class="se">\</span>
    <span class="nt">--FeatureMatching</span>.use_gpu 1

colmap mapper <span class="se">\</span>
    <span class="nt">--database_path</span>  colmap/database.db <span class="se">\</span>
    <span class="nt">--image_path</span>     colmap/images <span class="se">\</span>
    <span class="nt">--output_path</span>    colmap/sparse <span class="se">\</span>
    <span class="nt">--Mapper</span>.max_num_models<span class="o">=</span>1 <span class="se">\</span>
    <span class="nt">--Mapper</span>.init_min_tri_angle<span class="o">=</span>4 <span class="se">\</span>
    <span class="nt">--Mapper</span>.filter_min_tri_angle<span class="o">=</span>0.5

colmap image_undistorter <span class="se">\</span>
    <span class="nt">--image_path</span>     colmap/images <span class="se">\</span>
    <span class="nt">--input_path</span>     colmap/sparse/0 <span class="se">\</span>
    <span class="nt">--output_path</span>    colmap/undistorted
</code></pre></div></div>

<p>The rest of this post is about the flags, because that is where the interesting
decisions live.</p>

<h2 id="single_camera--tell-it-what-you-know"><code class="language-plaintext highlighter-rouge">single_camera</code> — tell it what you know</h2>

<p>Back to the square for a moment. Two hundred tourists means two hundred
different cameras and phones, each with its own lens, and part of the puzzle is
working out what each lens does to the picture. But if <em>you</em> took all two hundred
photographs yourself, on one phone, then there is only one lens to figure out —
and saying so out loud saves an enormous amount of guessing.</p>

<p>That is this flag. <code class="language-plaintext highlighter-rouge">--ImageReader.single_camera 1</code> declares that every image came
from the same physical camera with the same settings, so they share one set of
<strong>intrinsics</strong>: focal length, principal point, and lens distortion.</p>

<p>If your frames were extracted from a single video, this is simply true, and
asserting it is close to free accuracy. Instead of solving for those parameters
once per image, the solver estimates one set constrained by every image at once.
Fewer unknowns, better conditioned, less drift.</p>

<p>The corollary: if you <em>did</em> change lenses or zoom mid-session, this flag is a
lie and it will quietly bend your reconstruction. It is worth being sure.</p>

<h2 id="matching--the-step-that-costs">Matching — the step that costs</h2>

<p>Imagine being handed the two hundred photographs and asked to find every pair
that shows the same corner of the square. Nobody labelled them. The only way to
be certain is to hold up each photograph against every other one — and that is a
lot of holding up.</p>

<p>This is why matching, not feature extraction, is where the time goes. Finding
the memorable spots in one photograph is quick and can be done for all of them
at once. Working out <em>which photographs overlap</em> has no cheap answer.</p>

<figure>
  <img src="/images/blog/matching-strategies.svg" alt="Sixteen photographs arranged in a ring. On the left, exhaustive matching draws a line between every pair, producing a dense tangle. On the right, sequential matching connects each photograph only to its near neighbours in capture order, producing a thin band around the ring." />
  <figcaption>Exhaustive matching compares every pair, which is thorough and
  quadratic. Sequential matching exploits the fact that video frames arrive in
  order, and only compares each frame with the ones near it in time.</figcaption>
</figure>

<p><code class="language-plaintext highlighter-rouge">exhaustive_matcher</code> tries every pair. For <em>N</em> images that is <em>N(N−1)/2</em>
comparisons — fine at 200 images, unpleasant at 1,000, hopeless at 5,000. It is
also the safest option, because it cannot miss an overlap.</p>

<p><code class="language-plaintext highlighter-rouge">sequential_matcher</code> assumes your images arrive in capture order, which they do
if you extracted them from a video, and only matches each frame against a window
of its neighbours:</p>

<div class="language-bash highlighter-rouge"><div class="highlight"><pre class="highlight"><code>colmap sequential_matcher <span class="se">\</span>
    <span class="nt">--database_path</span> colmap/database.db <span class="se">\</span>
    <span class="nt">--SequentialMatching</span>.overlap 30 <span class="se">\</span>
    <span class="nt">--FeatureMatching</span>.use_gpu 1
</code></pre></div></div>

<p>I switch between the two on frame count — exhaustive under a few hundred,
sequential above. The thing to know about sequential matching is that it only
sees time-adjacent pairs, so when you walk a full circle around a plant, the
last frame and the first frame overlap in space but are far apart in the
sequence. That loop never closes, and the reconstruction can drift all the way
round without anything pulling it shut. COLMAP has vocabulary-tree loop
detection to fix exactly this; if you go sequential on a walkaround, turn it on.</p>

<h2 id="the-mapper-and-triangulation-angle">The mapper, and triangulation angle</h2>

<p>The mapper is the actual Structure-from-Motion solver. It chooses a good initial
image pair, triangulates points between them, then registers the remaining
images one at a time, re-running bundle adjustment periodically to keep
everything consistent.</p>

<p>Two of my flags are about <strong>triangulation angle</strong>. Here is the everyday version.
Your two eyes sit about six centimetres apart, and that gap is what lets you
judge distance. Now imagine your eyes were only two millimetres apart. They would
still both see the room perfectly well — but the two views would be so nearly
identical that you would have almost no sense of what was near and what was far.</p>

<p>The angle between two viewpoints, measured at the object they are both looking
at, is the triangulation angle, and it is exactly this: a small angle means a
weak opinion about depth.</p>

<p><code class="language-plaintext highlighter-rouge">--Mapper.init_min_tri_angle=4</code> therefore requires at least four degrees between
the two cameras of the <em>initial</em> pair — the pair COLMAP builds everything else
on top of. Two nearly identical viewpoints can match beautifully and still say
almost nothing about depth: the rays are close to parallel, so a small error in
the image sends their intersection sliding a long way. Starting from that is how
you get a reconstruction that looks plausible and is wrong.</p>

<p><code class="language-plaintext highlighter-rouge">--Mapper.filter_min_tri_angle=0.5</code> is the same idea applied afterwards,
discarding points whose observations are too close to parallel to be trusted.</p>

<p><code class="language-plaintext highlighter-rouge">--Mapper.max_num_models=1</code> is a different kind of choice. Think of a jigsaw
where two clusters of pieces each fit together nicely, but nothing joins the two
clusters — you finish with two islands and no way to know how they sit relative
to each other. Given photographs it cannot link into one consistent scene,
COLMAP will happily hand you exactly that: two or three separate models. That is COLMAP being honest — the connections were not there —
but for my purposes a fragmented capture is a failed capture, and I would rather
find that out immediately than discover it later in a splat that covers half a
plant.</p>

<h2 id="where-it-fails-on-plants">Where it fails on plants</h2>

<p>The general advice above applies to any scene. Plants add their own problems,
and all of them trace back to a single assumption: <strong>Structure-from-Motion
assumes the scene is rigid and static.</strong></p>

<p>The statue in the square is an ideal subject precisely because it does not move.
Now imagine the tourists photographing something less cooperative — a busy
market stall, where between one photograph and the next the crates have been
restacked and half the produce has been sold. Recognising “the same thing” in
two photographs stops meaning what it did, and the whole method begins to fight
itself.</p>

<p>A plant is a mild version of that market stall.</p>

<p><strong>Foliage moves.</strong> A greenhouse has ventilation fans, air currents, and leaves
light enough to respond to both. Between two frames a few seconds apart, the
leaf has changed shape. That feature match is now geometrically inconsistent
with every static point in the scene, and it enters the solve as an outlier.
RANSAC absorbs some of this. Enough of it and registration simply fails. The
practical answer is unglamorous: capture faster, and capture when the fans are
off.</p>

<p><strong>Leaves are poor features.</strong> A green surface with a smooth gradient and few
distinctive marks yields few keypoints. What COLMAP latches onto instead is soil
texture, pot rims, plant labels, bench edges, and greenhouse clutter. This is
usually enough to solve the camera poses — which is what you actually need — but
the sparse cloud is often much thinner <em>on the plant</em> than beginners expect.
Sparse points on the crop are not necessarily a failure.</p>

<p><strong>Greenhouses repeat themselves.</strong> Identical pots, identical trays, evenly
spaced benches, a repeating structural frame. Repetitive structure is the
classic way to get confident false matches, and confident false matches produce
reconstructions that are locally clean and globally folded.</p>

<p><strong>Glass and sky.</strong> Backlighting through greenhouse glazing blows out leaf detail
and drives auto-exposure to swing between frames. Specular highlights move with
the camera, which means they are features that violate the static-scene
assumption by construction.</p>

<h2 id="reading-the-result">Reading the result</h2>

<p>Before spending GPU hours on splatting, check three things.</p>

<p>First, <strong>how many images registered</strong>. The mapper reports this. If you gave it
600 frames and it registered 340, you do not have the capture you think you
have, and the missing 260 are usually contiguous — that is where something went
wrong in the room.</p>

<p>Second, <strong>how many models came out</strong>. More than one means the scene did not
connect.</p>

<p>Third, <strong>look at the sparse cloud</strong>. Not as a formality: open it and see whether
the shape is the plant. A folded or doubled reconstruction is obvious in three
seconds of viewing and invisible in the log.</p>

<h2 id="two-operational-notes">Two operational notes</h2>

<p>Build matters. The COLMAP in your distribution’s package manager may be compiled
without CUDA, and the GPU flags above then do nothing or fail outright. I keep a
CUDA-enabled build separate from the system one for this reason.</p>

<p>And on a headless machine, COLMAP will try to create an OpenGL context and
crash. <code class="language-plaintext highlighter-rouge">export QT_QPA_PLATFORM=offscreen</code> fixes it. This cost me an afternoon
once, and the error message points nowhere useful.</p>

<h2 id="what-you-have-at-the-end">What you have at the end</h2>

<p>Camera poses for every registered image, a sparse point cloud, and undistorted
images — everything a splat optimiser needs to begin.</p>

<p>What you do not have is any idea how large the plant is. COLMAP is scrupulous
about geometry and silent about scale, for the reason the
<a href="/posts/2026/07/how-a-computer-sees-a-plant-in-3d/">earlier post</a>
gave: nothing in the process ever compared a photograph to a ruler.</p>

<hr />

<p><em>Back to the main series next: measuring a plant’s traits without ever fixing
the scale.</em></p>]]></content><author><name>AL Zobaer</name><email>zobaer.al.24@shizuoka.ac.jp</email></author><category term="3d-reconstruction" /><category term="colmap" /><category term="tools" /><category term="phenotyping" /><summary type="html"><![CDATA[Two hundred tourists photograph a statue, and from the photographs alone you can work out where each of them stood. That is Structure-from-Motion, and COLMAP is the program that does it — explained from scratch, then in practice.]]></summary></entry><entry xml:lang="bn"><title type="html">Gaussian Splat কী?</title><link href="https://alzobaer.github.io/bn/posts/2026/07/what-is-a-gaussian-splat/" rel="alternate" type="text/html" title="Gaussian Splat কী?" /><published>2026-07-22T00:00:00+00:00</published><updated>2026-07-22T00:00:00+00:00</updated><id>https://alzobaer.github.io/bn/posts/2026/07/what-is-a-gaussian-splat-bn</id><content type="html" xml:base="https://alzobaer.github.io/bn/posts/2026/07/what-is-a-gaussian-splat/"><![CDATA[<p><a href="/bn/posts/2026/07/how-a-computer-sees-a-plant-in-3d/">আগের লেখায়</a>
আমরা বিন্দুমেঘ পর্যন্ত পৌঁছেছিলাম: শূন্যে ভাসতে থাকা হাজার হাজার বিন্দু, যার
প্রতিটি গাছের এমন এক টুকরো যা নিয়ে সফটওয়্যার নিশ্চিত ছিল।</p>

<p>কিন্তু বিন্দুমেঘ এখনো মডেল নয়। এ কেবল কতগুলো নমুনা, যাদের মাঝখানে কিছুই নেই।
জুম করে কাছে গেলে গাছটি ফাঁকে ফাঁকে মিলিয়ে যায়।</p>

<h2 id="চেনা-পরবর্তী-ধাপ">চেনা পরবর্তী ধাপ</h2>

<p>প্রচলিত পদক্ষেপ হলো একটি <strong>মেশ</strong> বানানো: বিন্দুগুলোর উপর ছোট ছোট ত্রিভুজের
একটি চামড়া টেনে দেওয়া, যাতে ফাঁকগুলো বুজে যায় এবং একটি অবিচ্ছিন্ন তল পাওয়া যায়।</p>

<p>এটি চমৎকার কাজ করে, আর কম্পিউটার গ্রাফিক্সের প্রায় পুরোটাই এর উপর দাঁড়ানো।
কফির মগ, গাড়ির দরজা, জাদুঘরের ভাস্কর্য — মেশ সবগুলোকেই ভালোভাবে বর্ণনা করে,
কারণ এগুলোই ঠিক তাই যা মেশ ধরে নেয়: নিরেট, অস্বচ্ছ বস্তু, যাদের ভেতর আর বাইরের
মাঝে একটি পরিষ্কার সীমানা আছে।</p>

<h2 id="গাছ-এই-ধারণাগুলোর-প্রতিটিই-ভাঙে">গাছ এই ধারণাগুলোর প্রতিটিই ভাঙে</h2>

<p>পাতা নিরেট নয়। এটি একটি পাতলা পাত, এত পাতলা যে “ভেতর” বলে কিছু প্রায় নেই-ই —
ফলে মেশকে হয় প্রায় লেগে থাকা দুটি তল হিসেবে, নয়তো পুরুত্বহীন একটিমাত্র তল
হিসেবে একে দেখাতে হয়, আর কোনোটিতেই স্বস্তি নেই।</p>

<p>পাতা অস্বচ্ছও নয়। জানালার আলোর সামনে ধরুন, আলো ভেদ করে আসতে দেখবেন। একটি
ত্রিভুজ হয় আছে, নয় নেই; <em>আংশিকভাবে</em> বলার কোনো শব্দ তার নেই।</p>

<p>আর পাতার ছাউনি নিজেকেই আড়াল করে। পাতা পাতাকে ঢেকে রাখে, তাই বিন্দুমেঘে সবসময়
এমন অঞ্চল থেকে যায় যা কোনো ক্যামেরাই দেখেনি। মেশ বানানোর সময় সফটওয়্যারকে সেখানে
কিছু একটা করতেই হয়, আর সে যা করে তা হলো অনুমান — ফাঁকের উপর সেতু বেঁধে দেওয়া,
কাছাকাছি চলে আসা দুটি আলাদা পাতাকে জুড়ে এক করে ফেলা, কিংবা যেখানে পাতা আসলে
আরও বিস্তৃত ছিল সেখানে খাঁজকাটা প্রান্ত রেখে দেওয়া।</p>

<figure>
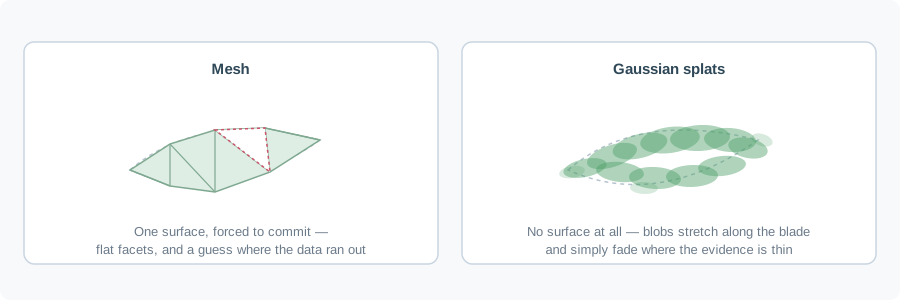
  <img src="/images/blog/mesh-vs-splats.svg" alt="একই পাতা দুইভাবে: বাঁয়ে মোটা দাগের ত্রিভুজ মেশ, সমতল ফলক, ছেঁটে যাওয়া আগা আর ভরাট করা একটি ফাঁক; ডানে পাতার ফলক বরাবর প্রসারিত নরম উপবৃত্তের সমষ্টি, যা প্রান্তের দিকে মিলিয়ে যায়।" />
  <figcaption>ভাঙা রেখাটিই আসল পাতা। মেশকে সর্বত্র একটি নির্দিষ্ট তল ঠিক করে
  ফেলতেই হয় — এমনকি সেখানেও, যেখানে কোনো ছবিই কিছু দেখেনি। স্প্ল্যাট মোটেই
  কোনো তলের দাবি করে না।</figcaption>
</figure>

<p>শেষ কথাটিই আমার কাছে সবচেয়ে গুরুত্বপূর্ণ। <strong>মেশকে সিদ্ধান্ত নিতেই হয়।</strong>
প্রতিটি ত্রিভুজ একটি কঠিন দাবি — তল ঠিক এখানেই। আর যেখানে প্রমাণ দুর্বল ছিল,
সেখানেও সে দাবিটি করে বসে, নিঃশব্দে, কোনটি মাপা আর কোনটি বানানো তা বোঝার
কোনো চিহ্ন না রেখে।</p>

<h2 id="অন্য-এক-উপস্থাপন">অন্য এক উপস্থাপন</h2>

<p>তাই তলটাই ছেড়ে দিন। একটিমাত্র চামড়ার বদলে গাছটিকে বর্ণনা করুন বহুসংখ্যক নরম,
আধা-স্বচ্ছ ফোঁটা দিয়ে।</p>

<p>প্রতিটি ফোঁটা একটি <strong>ত্রিমাত্রিক গাউসিয়ান</strong>: একটি ঝাপসা উপবৃত্তাকার পিণ্ড,
কেন্দ্রে সবচেয়ে ঘন, বাইরের দিকে মসৃণভাবে মিলিয়ে যাওয়া, কোথাও কোনো প্রান্ত নেই।
সে বহন করে সামান্য কয়েকটি সংখ্যা — কোথায় বসে আছে, তার আকার ও দিক, তার রং, আর
সে কতটা অস্বচ্ছ। একটি দৃশ্য মানে এমন কয়েক লক্ষ থেকে কয়েক মিলিয়ন ফোঁটা,
একে অপরের উপর ছড়িয়ে।</p>

<p>আঁকতে হলে প্রতিটি ফোঁটাকে ছবির তলে প্রক্ষেপ করুন, গভীরতা অনুসারে সাজান, আর
সামনে থেকে পেছনে মিশিয়ে দিন। ব্যস — কোনো রে-ট্রেসিং নেই, তলের সঙ্গে ছেদ বের
করা নেই। সমতল আকৃতি মেশানোর কাজটি গ্রাফিক্স হার্ডওয়্যার অসম্ভব ভালো পারে,
আর তাই স্প্ল্যাটের দৃশ্য রিয়েল-টাইমে আঁকা যায়। নামটিও এই ধাপ থেকেই এসেছে:
প্রতিটি ফোঁটাকে পর্দার উপর <em>ছিটিয়ে</em> দেওয়া হয়।</p>

<h2 id="ফোঁটাগুলো-আসে-কোথা-থেকে">ফোঁটাগুলো আসে কোথা থেকে</h2>

<p>এগুলো নকশা করা হয় না। এগুলো বসানো হয়, মিলিয়ে মিলিয়ে।</p>

<p>আগের লেখার বিন্দুমেঘ দিয়ে শুরু করুন, প্রতিটি বিন্দুতে একটি করে ফোঁটা বসান।
এবার এমন এক ক্যামেরা-অবস্থান থেকে এই এলোমেলো স্তূপটিকে আঁকুন যেখানকার আসল ছবি
আপনার হাতে আছে, আর দুটি ছবি মিলিয়ে দেখুন। মিলবে না।</p>

<p>গুরুত্বপূর্ণ ব্যাপারটি হলো, এই আঁকাটি প্রতিটি ফোঁটার প্রাচলের সাপেক্ষে একটি
<em>অন্তরকলনযোগ্য</em> ফাংশন। অর্থাৎ প্রতিটি ফোঁটার জন্য হিসাব করা যায় — তার অবস্থান
কোন দিকে ঠেলতে হবে, আকার কীভাবে টানতে হবে, রং কতটা সরাতে হবে, যাতে আঁকা ছবিটি
আসল ছবির আরও কাছে যায়। আপনার সব ছবির উপর এটি হাজার হাজার বার চালান, আর
ফোঁটাগুলো এমন এক বিন্যাসে থিতু হয় যা আপনার তোলা প্রতিটি দৃশ্যকেই ফিরিয়ে দেয়।</p>

<p>অপ্টিমাইজার সংখ্যাটাও নিয়ন্ত্রণ করে। যেখানে ভুল একগুঁয়েভাবে বড় থেকে যায়,
সেখানে সে ফোঁটা ভাঙে ও নকল করে বিস্তারিত বাড়ায়; আর যে ফোঁটার অস্বচ্ছতা প্রায়
শূন্যে নেমে গেছে, তাকে মুছে দেয়। একটি গাছের জন্য কয়টি ফোঁটা লাগবে, তা কেউ
বলে দেয় না।</p>

<p>আর পাতা জিনিসটা কী, সেটিও কেউ কখনো তাকে বলে না। একমাত্র নির্দেশ হলো:
<em>তোমার আঁকা ছবিগুলো যেন আমার তোলা ছবির মতো দেখায়।</em></p>

<h2 id="এটি-গাছের-জন্য-কেন-মানানসই">এটি গাছের জন্য কেন মানানসই</h2>

<p>উপবৃত্তাকার পিণ্ড প্রসারিত হতে পারে। একটি ফোঁটা পাতার ফলক বরাবর চ্যাপ্টা চাকতি
হয়ে শুয়ে পড়তে পারে, কিংবা কাণ্ড বা আকর্ষী বরাবর লম্বা সূচের মতো টেনে যেতে পারে।
এই দিকনির্ভর স্বাধীনতা — অ্যানআইসোট্রপি — এমনিতেই পাওয়া যায়, আর তার মানে সরু
গঠনের জন্য অনেক ফোঁটা লাগে না, লাগে কেবল সঠিক আকারের ফোঁটা।</p>

<p>অস্বচ্ছতা প্রতিটি ফোঁটার নিজস্ব এবং অবিচ্ছিন্ন, তাই স্বচ্ছতা আর নরম প্রান্ত
আন্দাজ না করে সরাসরি প্রকাশ করা যায়। আর এটি এমন কিছু দেয় যা মেশের পক্ষে
সম্ভব নয়: যেখানে ছবিগুলো অস্পষ্ট ছিল, সেখানে ফোঁটা কেবল ফিকে হয়েই থাকে।
মডেলটি তল বানিয়ে নেওয়ার বদলে দাবি করা থেকে বিরত থাকে।</p>

<p>ভুল করার মতো কোনো টপোলজিও এখানে নেই। কাছাকাছি চলে আসা দুটি পাতা দুটি আলাদা
ফোঁটার মেঘই থেকে যায়। কিছুই জোড়া লাগে না।</p>

<h2 id="যা-এটি-দেয়-না">যা এটি দেয় না</h2>

<p>সৎভাবে, দুটি সীমাবদ্ধতা।</p>

<p>প্রথমত, এটি <em>আঁকার</em> জন্য বানানো উপস্থাপন, <em>মাপার</em> জন্য নয়। একটি স্প্ল্যাট
মডেলকে জিজ্ঞেস করুন “পাতার তলটি ঠিক কোথায়?” — একক কোনো উত্তর নেই, কারণ
পুরো কথাটাই তো এই যে সে কখনো কোনো তল আঁকেনি। ঝাপসা ফোঁটার মেঘ থেকে পাতার
ক্ষেত্রফল বের করা রীতিমতো একটি কাজ, নিছক দেখে নেওয়া নয়।</p>

<p>দ্বিতীয়ত, আর এই ধারাবাহিকের জন্য এটিই বেশি জরুরি: স্প্ল্যাটিং আগের লেখার
সমস্যাটি হুবহু উত্তরাধিকারসূত্রে পায়। ফোঁটাগুলো সেই একই অনির্দিষ্ট এককের
জগতে বাস করে, যেখান থেকে বিন্দুমেঘটি এসেছিল। Gaussian Splatting উন্নত করে
মডেলটি কতটা বিশ্বস্তভাবে গাছের মতো <em>দেখায়</em> তা। গাছটি কত বড়, সে বিষয়ে
এটি কিছুই করে না।</p>

<p>সুতরাং এখন আমাদের হাতে আছে গাছের এক সুন্দর, উচ্চ-নিষ্ঠ মডেল — যার আকার
অজানা।</p>

<hr />

<p><em>এই ধারাবাহিকের পরের পর্ব: স্কেল একবারও ঠিক না করে গাছের বৈশিষ্ট্য মাপা যায় কীভাবে।</em></p>]]></content><author><name>AL Zobaer</name><email>zobaer.al.24@shizuoka.ac.jp</email></author><category term="basics" /><category term="3d-gaussian-splatting" /><category term="3d-reconstruction" /><summary type="html"><![CDATA[বিন্দুমেঘ থেকে মডেল বানানোর চেনা পথ হলো তার উপর একটি তল টেনে দেওয়া। গাছ সেই ধারণাটিকেই ভেঙে দেয় — তাই বিকল্পটি কী, সেটাই এখানে।]]></summary></entry><entry xml:lang="ja"><title type="html">Gaussian Splat とは何か</title><link href="https://alzobaer.github.io/ja/posts/2026/07/what-is-a-gaussian-splat/" rel="alternate" type="text/html" title="Gaussian Splat とは何か" /><published>2026-07-22T00:00:00+00:00</published><updated>2026-07-22T00:00:00+00:00</updated><id>https://alzobaer.github.io/ja/posts/2026/07/what-is-a-gaussian-splat-ja</id><content type="html" xml:base="https://alzobaer.github.io/ja/posts/2026/07/what-is-a-gaussian-splat/"><![CDATA[<p><a href="/ja/posts/2026/07/how-a-computer-sees-a-plant-in-3d/">前回の記事</a>
では点群までたどり着きました。空間に浮かぶ何千もの点。そのひとつひとつが、
ソフトウェアが確信をもって捉えた植物の一片です。</p>

<p>しかし点群は、まだモデルではありません。あるのは標本点だけで、その間には何も
ありません。拡大していけば、植物は隙間へと溶けていきます。</p>

<h2 id="定石としての次の一手">定石としての次の一手</h2>

<p>標準的な手順は<strong>メッシュ</strong>を作ることです。点の上に微小な三角形の皮を張り、
隙間を閉じて連続した面にする。</p>

<p>これは見事に機能しますし、コンピュータグラフィックスのほとんどはこの上に
築かれています。マグカップ、車のドア、美術館の彫像 — メッシュはどれもうまく
記述します。それらがまさにメッシュの前提そのものだからです。すなわち、
中身が詰まっていて、不透明で、内と外の境界がはっきりしている物体。</p>

<h2 id="植物はその前提をひとつ残らず壊す">植物は、その前提をひとつ残らず壊す</h2>

<p>葉は中身の詰まった物体ではありません。薄い一枚のシートであり、「内側」が
ほとんど存在しない。だからメッシュは、それをほぼ密着した二枚の面として
表すか、厚みのない一枚の面として表すしかなく、どちらも収まりが悪い。</p>

<p>葉は不透明でもありません。窓にかざせば光が透けて見えます。三角形は「ある」か
「ない」かのどちらかで、<em>部分的に</em>という語彙を持ちません。</p>

<p>そして群落は自分自身を隠します。葉が葉を遮るため、点群にはどのカメラも
見なかった領域が必ず残ります。メッシュ化の処理はそこで何かをせざるを得ず、
実際にしているのは推測です — 隙間に橋を架け、たまたま近くを通っただけの
二枚の葉を一枚に溶接し、あるいは本当は続いていた葉身の縁をぎざぎざのまま
放置する。</p>

<figure>
  <img src="/images/blog/mesh-vs-splats.svg" alt="同じ葉を二通りに表した図。左は粗い三角形メッシュで、平坦な面と切り落とされた先端、埋められた穴がある。右は葉身に沿って伸びた柔らかい楕円の集まりで、縁に向かって薄れていく。" />
  <figcaption>破線が実際の葉です。メッシュはどこであれ正確な面を確定させねば
  なりません — 写真が何も捉えなかった場所でさえも。一方スプラットは、
  そもそも面というものを主張しません。</figcaption>
</figure>

<p>最後の点が、私にとっていちばん重要です。<strong>メッシュは確定を強いられる。</strong>
どの三角形も「面はまさにここにある」という断定です。そして証拠が乏しい
場所でも、やはり断定してしまう — 黙って、どこが実測でどこが捏造かを示す
印も残さずに。</p>

<h2 id="別の表現へ">別の表現へ</h2>

<p>そこで面を手放します。一枚の皮の代わりに、多数の柔らかく半透明な粒で植物を
記述するのです。</p>

<p>粒のひとつひとつは<strong>3次元ガウシアン</strong>です。中心がもっとも濃く、外側へなめらかに
薄れていく、どこにも輪郭を持たないぼんやりした楕円体。持っている数値はごく
わずかで、位置、形と向き、色、そして不透明度だけ。ひとつのシーンは、それが
数十万から数百万個、重なり合ってできています。</p>

<p>描画は、すべての粒を画像平面へ投影し、奥行き順に並べ、手前から奥へ合成する
だけ。レイトレーシングも面との交差判定もありません。平面図形の合成はGPUが
きわめて得意とする処理で、だからスプラットのシーンはリアルタイムで描けます。
名前もこの工程から来ています — 粒を画面へ<em>splat</em>（叩きつける）のです。</p>

<h2 id="粒はどこから来るのか">粒はどこから来るのか</h2>

<p>設計されるのではなく、当てはめられます。</p>

<p>前回の点群から始め、各点にひとつずつ粒を置く。次に、実際の写真がある
カメラ位置からその集まりを描画し、二枚の画像を比べます。当然、一致しません。</p>

<p>決定的なのは、この描画がすべての粒のパラメータについて<em>微分可能</em>な関数だと
いうことです。つまり粒ごとに、位置をどちらへ動かし、形をどう伸ばし、色を
どうずらせば描画が写真へ近づくかを計算できる。それを手持ちのすべての写真に
わたって何万回と繰り返せば、粒は撮影したあらゆる視点を再現する配置へ
落ち着いていきます。</p>

<p>最適化は個体数も制御します。誤差が頑固に大きいままの場所では粒を分割・複製
して密度を上げ、不透明度がほぼ零へ落ちた粒は削除する。植物に何個の粒が必要か
を、人が指定することはありません。</p>

<p>そして葉が何であるかも、誰も教えません。唯一の指示はこうです —
<em>お前の描画が、私の写真のように見えること。</em></p>

<h2 id="なぜこれが植物に向くのか">なぜこれが植物に向くのか</h2>

<p>楕円体は伸びます。粒は葉身に沿って薄い円盤へ潰れることも、茎や巻きひげに
沿って細長い針へ伸びることもできる。この方向の自由度 — 異方性 — がはじめから
備わっているので、細い構造に多数の粒は要らず、うまい形の粒があればよい。</p>

<p>不透明度は粒ごとに連続値をとるため、透過性や柔らかな縁は近似ではなく素直に
表現できます。そしてメッシュには持ち得ないものをこの表現に与えます。写真が
曖昧だった場所では、粒はただ薄いまま留まる。面を捏造する代わりに、
主張することを控えるのです。</p>

<p>位相を間違える余地もありません。近くを通り過ぎる二枚の葉は、二つの粒の
集まりのままです。溶接は起こりません。</p>

<h2 id="それでも得られないもの">それでも得られないもの</h2>

<p>正直に、二つの限界を。</p>

<p>第一に、これは<em>描画</em>のための表現であって、<em>計測</em>のための表現ではありません。
スプラットのモデルに「葉の面は正確にどこか」と尋ねても、答えはひとつに
定まりません — そもそも面を引かなかったことこそが要点だからです。
ぼんやりした粒の雲から葉面積を取り出すのは、参照ではなく相応の仕事です。</p>

<p>第二に、そしてこの連載にとってより重要なのは、スプラッティングが前回の問題を
そっくりそのまま引き継ぐことです。粒は、点群が置かれていたのと同じ
任意単位の空間に住んでいます。3D Gaussian Splatting が改善するのは、モデルが
どれだけ忠実に植物のように<em>見えるか</em>であって、その植物がどれだけ大きいかに
ついては何ひとつしません。</p>

<p>こうして手元には、美しく高忠実度な植物のモデルが残りました — 大きさの
わからないモデルが。</p>

<hr />

<p><em>連載の次回：スケールを一度も確定させずに、植物の形質を測る方法。</em></p>]]></content><author><name>AL Zobaer</name><email>zobaer.al.24@shizuoka.ac.jp</email></author><category term="basics" /><category term="3d-gaussian-splatting" /><category term="3d-reconstruction" /><summary type="html"><![CDATA[点群をモデルにする定石は、その上に面を張ることです。しかし植物は、その前提を容赦なく突き崩します。ではどうするか。]]></summary></entry><entry xml:lang="en"><title type="html">What is a Gaussian Splat?</title><link href="https://alzobaer.github.io/posts/2026/07/what-is-a-gaussian-splat/" rel="alternate" type="text/html" title="What is a Gaussian Splat?" /><published>2026-07-22T00:00:00+00:00</published><updated>2026-07-22T00:00:00+00:00</updated><id>https://alzobaer.github.io/posts/2026/07/what-is-a-gaussian-splat</id><content type="html" xml:base="https://alzobaer.github.io/posts/2026/07/what-is-a-gaussian-splat/"><![CDATA[<p>In the <a href="/posts/2026/07/how-a-computer-sees-a-plant-in-3d/">previous post</a>
we got as far as a point cloud: thousands of dots floating in space, each one a
speck of the plant the software was confident about.</p>

<p>A point cloud is not yet a model, though. It is a set of samples with nothing in
between them. Zoom in and the plant dissolves into gaps.</p>

<h2 id="the-usual-next-step">The usual next step</h2>

<p>The standard move is to build a <strong>mesh</strong>: stretch a skin of tiny triangles over
the points so that the gaps close and you have a continuous surface.</p>

<p>This works beautifully, and almost all of computer graphics is built on it. A
coffee mug, a car door, a museum statue — a mesh describes all of them well,
because they are exactly what a mesh assumes: solid, opaque objects with a clean
boundary between inside and outside.</p>

<h2 id="plants-break-every-one-of-those-assumptions">Plants break every one of those assumptions</h2>

<p>A leaf is not solid. It is a sheet, thin enough that “inside” barely exists — so
the mesh has to represent it as two surfaces almost touching, or one surface
with no thickness at all, and neither is comfortable.</p>

<p>A leaf is not opaque either. Hold one up to a window and you can see the light
coming through. A triangle is either there or it is not; it has no vocabulary
for <em>partly</em>.</p>

<p>And a canopy hides itself. Leaves occlude other leaves, so the point cloud
always has regions no camera ever saw. The mesher must do something there, and
what it does is guess — bridging across a gap, welding two separate leaves into
one because they happened to pass close together, or leaving a ragged edge where
the blade actually continued.</p>

<figure>
  <img src="/images/blog/mesh-vs-splats.svg" alt="The same leaf twice: on the left a coarse triangle mesh with flat facets, cut corners and a filled-in hole; on the right a set of soft overlapping ellipses stretched along the blade that fade out at the edges." />
  <figcaption>The dashed line is the real leaf. A mesh has to commit to an exact
  surface everywhere, including where no photograph resolved one. Splats never
  claim a surface in the first place.</figcaption>
</figure>

<p>That last point is the one that matters most to me. <strong>A mesh has to commit.</strong>
Every triangle is a hard assertion that the surface is exactly here — and where
the evidence was weak, it asserts anyway, silently, with no mark to tell you
which parts were measured and which were invented.</p>

<h2 id="a-different-representation">A different representation</h2>

<p>So drop the surface. Instead of one skin, describe the plant with a large number
of soft, semi-transparent blobs.</p>

<p>Each blob is a <strong>3D Gaussian</strong>: a fuzzy ellipsoid, densest at its centre and
fading smoothly outward, with no edge anywhere. It carries only a few numbers —
where it sits, its shape and orientation, its colour, and how opaque it is. A
scene is a few hundred thousand to a few million of them, overlapping.</p>

<p>To render, you project every blob onto the image plane, sort them by depth, and
blend them front to back. That is all — no ray tracing, no surface intersection.
Blending flat shapes is something graphics hardware is extremely good at, which
is why a splat scene renders in real time. The name comes from that step: each
blob is <em>splatted</em> onto the screen.</p>

<h2 id="where-the-blobs-come-from">Where the blobs come from</h2>

<p>They are not designed. They are fitted.</p>

<p>Start with the point cloud from the previous post and put one blob at each
point. Now render that mess from a camera position where you happen to have a
real photograph, and compare the two images. They will not match.</p>

<p>The crucial property is that the render is a <em>differentiable</em> function of every
blob’s parameters. That means you can compute, for each blob, which way to nudge
its position, stretch its shape, or shift its colour so the render moves closer
to the photograph. Do that across all your photographs, tens of thousands of
times over, and the blobs settle into an arrangement that reproduces every view
you captured.</p>

<p>The optimiser also controls the population. Where the error stays stubbornly
high, it splits and clones blobs to add detail; where a blob has drifted to
near-zero opacity, it deletes it. Nobody specifies how many blobs a plant needs.</p>

<p>And nobody ever tells it what a leaf is. The only instruction is: <em>your renders
should look like my photographs.</em></p>

<h2 id="why-this-suits-a-plant">Why this suits a plant</h2>

<p>An ellipsoid can stretch. A blob can flatten into a thin disc lying along a leaf
blade, or draw out into a long needle running up a stem or a tendril. That
directional freedom — anisotropy — comes for free, and it means fine structures
do not need many blobs, just well-shaped ones.</p>

<p>Opacity is per-blob and continuous, so translucency and soft edges are
expressible rather than approximated. And it gives the representation something
a mesh cannot have: where the photographs were ambiguous, blobs simply stay
faint. The model declines to assert a surface instead of inventing one.</p>

<p>There is also no topology to get wrong. Two leaves that pass close together stay
two clouds of blobs. Nothing welds.</p>

<h2 id="what-it-does-not-give-you">What it does not give you</h2>

<p>Two honest limitations.</p>

<p>First, it is a representation built for <em>rendering</em>, not for <em>measuring</em>. Ask a
splat model “where exactly is the leaf surface?” and there is no single answer —
the whole point is that it never drew one. Getting a leaf area out of a cloud of
fuzzy blobs is real work, not a lookup.</p>

<p>Second, and more importantly for this series: splatting inherits the problem
from the last post completely. The blobs live in the same arbitrary-unit space
the point cloud came from. Gaussian Splatting improves how faithfully the model
<em>looks</em> like the plant. It does nothing at all about how big the plant is.</p>

<p>So we now have a beautiful, high-fidelity model of a plant — of unknown size.</p>

<hr />

<p><em>Next in this series: how to measure a plant’s traits without ever fixing the
scale.</em></p>]]></content><author><name>AL Zobaer</name><email>zobaer.al.24@shizuoka.ac.jp</email></author><category term="basics" /><category term="3d-gaussian-splatting" /><category term="3d-reconstruction" /><summary type="html"><![CDATA[The usual way to turn a point cloud into a model is to stretch a surface over it. Plants punish that assumption — so here is the alternative.]]></summary></entry><entry xml:lang="bn"><title type="html">কম্পিউটার কীভাবে গাছকে ত্রিমাত্রিকভাবে দেখে</title><link href="https://alzobaer.github.io/bn/posts/2026/07/how-a-computer-sees-a-plant-in-3d/" rel="alternate" type="text/html" title="কম্পিউটার কীভাবে গাছকে ত্রিমাত্রিকভাবে দেখে" /><published>2026-07-21T00:00:00+00:00</published><updated>2026-07-21T00:00:00+00:00</updated><id>https://alzobaer.github.io/bn/posts/2026/07/how-a-computer-sees-a-plant-in-3d-bn</id><content type="html" xml:base="https://alzobaer.github.io/bn/posts/2026/07/how-a-computer-sees-a-plant-in-3d/"><![CDATA[<p><a href="/bn/posts/2026/07/what-is-plant-phenotyping/">আগের লেখায়</a>
হাতে গাছ মাপার সমস্যাগুলো বলেছিলাম: এটি বড় পরিসরে চলে না, অসঙ্গত, আর সবচেয়ে
নির্ভুল পদ্ধতিগুলো গাছটিকেই নষ্ট করে ফেলে। স্বাভাবিক সমাধান হলো গাছের বদলে
ছবি তোলা, আর ছবিটাই মাপা।</p>

<p>কিন্তু ছবি তো সমতল। গাছ নয়। তাহলে একটি থেকে অন্যটিতে পৌঁছানো যায় কীভাবে?</p>

<h2 id="দুই-চোখ-এক-দূরত্ব">দুই চোখ, এক দূরত্ব</h2>

<p>শুরু করা যাক এমন কিছু দিয়ে যা আপনি না ভেবেই করেন। মুখের সামনে একটি আঙুল তুলে
ধরুন, একবার এক চোখ বন্ধ করুন, তারপর অন্যটি। পেছনের দৃশ্যের সাপেক্ষে আঙুলটি
যেন লাফ দিয়ে সরে যায়।</p>

<p>ওই লাফটাই পুরো ব্যাপারটার মূল।</p>

<p>আপনার দুই চোখ প্রায় ছয় সেন্টিমিটার দূরত্ব থেকে পৃথিবী দেখে, ফলে প্রতিটি চোখ
সামান্য আলাদা ছবি পায়। কাছের জিনিস দুই দৃশ্যের মাঝে অনেকটা সরে; দূরের জিনিস
প্রায় সরেই না। মস্তিষ্ক এই সরে যাওয়ার পরিমাণ পড়ে নিয়ে গভীরতার বোধ তৈরি করে।</p>

<p>কম্পিউটারও একই কৌশল খাটায়, তবে একটি সুবিধাসহ: দুটি দৃশ্য একই মুহূর্তে আসতে হবে
না, আর নির্দিষ্ট এক জোড়া চোখ থেকেই আসতে হবে এমনও নয়। একটি ক্যামেরাকে সরিয়ে
নতুন জায়গায় নিলেই দ্বিতীয় দৃশ্যটি পাওয়া যায়।</p>

<h2 id="গাছের-চারপাশে-হাঁটুন">গাছের চারপাশে হাঁটুন</h2>

<p>তাহলে পদ্ধতিটি দাঁড়ায়: গাছের চারপাশে হাঁটতে হাঁটতে নানা অবস্থান থেকে বহু ছবি
তোলা।</p>

<figure>
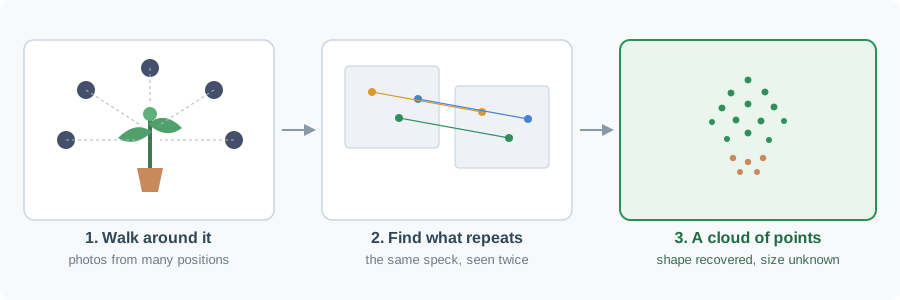
  <img src="/images/blog/photos-to-3d.svg" alt="তিনটি ধাপ: গাছের চারপাশের পাঁচটি অবস্থান থেকে ছবি তোলা; দুটি ছবির মধ্যে একই বিন্দু মেলানো; সেই মিল থেকে ত্রিমাত্রিক বিন্দুমেঘ।" />
  <figcaption>তিন চালে পুরো প্রক্রিয়াটি। নানা অবস্থান থেকে ছবি তুলুন, একাধিক
  ছবিতে ফিরে আসা বিন্দুগুলো খুঁজুন, আর সেই পুনরাবৃত্ত বিন্দুর জ্যামিতিই ঠিক করে
  দিক সবকিছু স্থানে কোথায় বসবে।</figcaption>
</figure>

<p>এবার সফটওয়্যার খোঁজে <strong>ফিচার</strong> — ছোট, স্বতন্ত্র অংশ, যা অন্য ছবিতেও চেনা যাবে।
পাতার ডগা, কাণ্ডের একটি খাঁজ, মাটির গায়ে দাগের বিন্দু। যা যথেষ্ট আলাদা, দুবার
চিনে নেওয়ার মতো।</p>

<p>তারপর শুরু হয় মেলানোর খেলা। ১২ নম্বর ছবির এই অংশটি — ১৩ নম্বর ছবির ওই অংশটির
সঙ্গে কি একই ভৌত বিন্দু? হাজার হাজার ফিচার আর শত শত ছবির জন্য এটি করুন, আর
তখনই অসাধারণ কিছু বেরিয়ে আসে।</p>

<p>প্রতিটি মিল একটি শর্ত আরোপ করে। যদি একটি বিন্দু এক ছবিতে <em>এখানে</em> আর অন্য ছবিতে
<em>ওখানে</em> পড়ে, তবে ক্যামেরা দুটিকে পরস্পরের ও ওই বিন্দুর সাপেক্ষে নির্দিষ্ট
অবস্থানেই থাকতে হবে — নইলে হিসাব মেলে না। যথেষ্ট শর্ত জমলে কেবল একটিমাত্র
বিন্যাসই সবগুলো মেটায়। সফটওয়্যার সেই বিন্যাসটি বের করে, একই সঙ্গে জেনে নেয়
<strong>প্রতিটি ছবি কোথা থেকে তোলা</strong> আর <strong>প্রতিটি বিন্দু স্থানে কোথায়</strong>।</p>

<p>এটাই <strong>Structure-from-Motion</strong>: ক্যামেরার গতিবিধি থেকে গঠন উদ্ধার। ফল হলো একটি
<em>বিন্দুমেঘ</em> (point cloud) — ত্রিমাত্রিক শূন্যে ভাসমান হাজারো বিন্দু, যারা মিলে
গাছটির আকৃতি আঁকে।</p>

<h2 id="গোলমালটা-এখানে">গোলমালটা এখানে</h2>

<p>এবার সেই অংশ, যা শুনে অনেকে অবাক হন — এবং যার জন্যই আমার গবেষণা।</p>

<p>ওই পুনর্গঠন সব দিক থেকে বিশ্বস্ত, কেবল একটি বাদে। অনুপাত ঠিক, আকৃতি ঠিক,
জ্যামিতি ঠিক। <strong>আকার</strong> নির্ধারিত নয়।</p>

<p>কেন, ভেবে দেখুন। প্রক্রিয়ার প্রতিটি শর্ত এসেছে ছবির সঙ্গে ছবির তুলনা থেকে।
কোথাও কোনো ছবিকে স্কেলের সঙ্গে মেলানো হয়নি। দূর থেকে তোলা বড় গাছ আর কাছ থেকে
তোলা ছোট গাছ <em>হুবহু একই</em> ছবি দেয় — তাই ছবির ভেতরে এমন কিছুই নেই যা দুটিকে
আলাদা করতে পারে।</p>

<p>ফলে পুনর্গঠনটি আসে ইচ্ছামাফিক এককে। এটি গাছের নিখুঁত মডেল, কিন্তু অজানা স্কেলে;
আর “অজানা” মানে প্রতিবার পুনর্গঠনে তা ভিন্ন হতে পারে। একই গাছ, মঙ্গলবার আর
শুক্রবার, দুই স্কেল — আর সেই স্কেল স্থির না করা পর্যন্ত সেন্টিমিটারে কোনো
পরিমাপেরই অর্থ নেই।</p>

<p>চিরাচরিত সমাধান হলো দৃশ্যের ভেতর জানা মাপের কোনো বস্তু রাখা, যেমন একটি
চেকারবোর্ড, আর তার সাপেক্ষে সফটওয়্যারকে ক্যালিব্রেট করা। এটি কাজ করে। এর মানে
এই-ও যে চালু গ্রিনহাউসে কাউকে প্রতিটি সেশনে ওই বস্তুটি রাখতে ও রক্ষণাবেক্ষণ
করতে হবে — চিরকাল।</p>

<p>বিকল্প হলো স্কেলের প্রয়োজনটাই ঘুচিয়ে ফেলা। পরের লেখা ঠিক সেটি নিয়েই।</p>

<hr />

<p><em>এই ধারাবাহিকের পরের পর্ব: Gaussian Splat কী, আর পাতাভরা গাছের জন্য তা
মেশ-এর চেয়ে ভালো কেন।</em></p>]]></content><author><name>AL Zobaer</name><email>zobaer.al.24@shizuoka.ac.jp</email></author><category term="basics" /><category term="3d-reconstruction" /><category term="phenotyping" /><summary type="html"><![CDATA[ক্যামেরা হাতে গাছের চারপাশে হাঁটলেই তাকে ত্রিমাত্রিকভাবে গড়ে তোলা যায়। কীভাবে — এবং এই পদ্ধতি নীরবে কোন কথাটি বলে না।]]></summary></entry><entry xml:lang="ja"><title type="html">コンピュータはどのように植物を3Dで見るのか</title><link href="https://alzobaer.github.io/ja/posts/2026/07/how-a-computer-sees-a-plant-in-3d/" rel="alternate" type="text/html" title="コンピュータはどのように植物を3Dで見るのか" /><published>2026-07-21T00:00:00+00:00</published><updated>2026-07-21T00:00:00+00:00</updated><id>https://alzobaer.github.io/ja/posts/2026/07/how-a-computer-sees-a-plant-in-3d-ja</id><content type="html" xml:base="https://alzobaer.github.io/ja/posts/2026/07/how-a-computer-sees-a-plant-in-3d/"><![CDATA[<p><a href="/ja/posts/2026/07/what-is-plant-phenotyping/">前回の記事</a>では、
手作業で植物を測ることの問題を挙げました。規模に耐えず、ばらつき、最も正確な
方法は植物そのものを壊してしまう。そこで素直な解決策は、植物ではなく写真を撮り、
その写真を測ることです。</p>

<p>しかし写真は平面で、植物は立体です。では、どうやって一方から他方へたどり着くの
でしょうか。</p>

<h2 id="二つの目と距離">二つの目と、距離</h2>

<p>まず、誰もが無意識にやっていることから始めます。顔の前に指を一本立て、片目ずつ
交互に閉じてみてください。背景に対して、指が横に跳ぶように見えます。</p>

<p>この「跳び」が、話の核心です。</p>

<p>私たちの両目は約6センチメートル離れた位置から世界を見ているため、それぞれが
わずかに違う像を得ます。近い物体は二つの視点間で大きくずれ、遠い物体はほとんど
ずれません。脳はこのずれの大きさを読み取り、奥行きの感覚に変換しています。</p>

<p>コンピュータも同じ仕掛けを使いますが、一つ条件が緩みます。二つの視点は同時刻で
ある必要も、固定された一対の目から得られる必要もありません。カメラを一台、別の
位置へ動かせば、それが二つ目の視点になります。</p>

<h2 id="植物のまわりを歩く">植物のまわりを歩く</h2>

<p>つまり手順はこうです。歩いて回りながら、多くの位置から植物を撮影する。</p>

<figure>
  <img src="/images/blog/photos-to-3d.svg" alt="三段階：植物のまわり5か所からの撮影、2枚の写真間での同一特徴点の対応付け、そこから得られる3D点群。" />
  <figcaption>三手で表した流れ。多くの位置から撮影し、複数の写真に現れる点を
  見つけ、その繰り返し現れる点の幾何によって、すべての位置関係を確定させます。</figcaption>
</figure>

<p>次にソフトウェアが探すのが<strong>特徴点（feature）</strong>です。別の写真でも同じものだと
見分けられる、小さく際立った部分——葉の先端、茎の切れ込み、土の表面の斑点。
二度見つけられる程度に、視覚的に特徴のあるものです。</p>

<p>そして対応付けが始まります。写真12のこの部分は、写真13のあの部分と同じ物理的な
一点だろうか。これを何千もの特徴点と何百枚もの写真について行うと、注目すべき
ことが起こります。</p>

<p>対応が一つ決まるたびに、条件が一つ加わります。ある点が一方の写真では<em>ここ</em>に、
別の写真では<em>そこ</em>に写るなら、二台のカメラは互いに、そしてその点に対して、特定の
位置になければ計算が合いません。条件が十分に積み重なると、それらすべてを満たす
配置は一つに絞られます。ソフトウェアはその配置を解き、<strong>各写真がどこから撮られたか</strong>
と<strong>各点が空間のどこにあるか</strong>を同時に復元します。</p>

<p>これが <strong>Structure-from-Motion</strong>（動きからの構造復元）です。出力は<em>点群</em>
（point cloud）——3D空間に浮かぶ無数の点が、まとまって植物の形をかたどります。</p>

<h2 id="落とし穴">落とし穴</h2>

<p>ここからが、多くの人が意外に思う部分であり、私の研究が存在する理由です。</p>

<p>この復元は、一点を除いてすべてにおいて忠実です。比率も、形状も、幾何も正しい。
しかし<strong>大きさ</strong>は決まりません。</p>

<p>理由を考えてみてください。この過程の条件はすべて、写真どうしの比較から生まれて
います。写真と物差しを比べる工程は、どこにもありません。遠くから撮った大きな株と、
近くから撮った小さな株は<em>まったく同じ画像</em>になります。ですから画像の中に、両者を
区別できるものは何もないのです。</p>

<p>したがって復元結果は任意単位で出てきます。未知のスケールにおける完璧なモデルで
あり、「未知」とは、再構成のたびに違う値になりうるという意味です。同じ株、火曜と
金曜、二つの異なるスケール——そのスケールを固定しない限り、センチメートルでの
計測に意味はありません。</p>

<p>一般的な対処は、チェッカーボードのような既知の大きさの物体を場面に置き、それを
基準に較正することです。これは有効に働きます。同時に、稼働中の温室で、毎回、
誰かがその基準物を設置し維持し続けなければならない、ということでもあります。</p>

<p>もう一つの道は、スケールを必要としない方法にしてしまうことです。次回はそれを
扱います。</p>

<hr />

<p><em>連載の次回：Gaussian Splat とは何か、そしてなぜ葉の多い植物にはメッシュより
適しているのか。</em></p>]]></content><author><name>AL Zobaer</name><email>zobaer.al.24@shizuoka.ac.jp</email></author><category term="basics" /><category term="3d-reconstruction" /><category term="phenotyping" /><summary type="html"><![CDATA[カメラを持って植物のまわりを歩けば、それを3Dで復元できます。その仕組みと、この方法が黙って語らないこと。]]></summary></entry><entry xml:lang="en"><title type="html">How a computer sees a plant in 3D</title><link href="https://alzobaer.github.io/posts/2026/07/how-a-computer-sees-a-plant-in-3d/" rel="alternate" type="text/html" title="How a computer sees a plant in 3D" /><published>2026-07-21T00:00:00+00:00</published><updated>2026-07-21T00:00:00+00:00</updated><id>https://alzobaer.github.io/posts/2026/07/how-a-computer-sees-a-plant-in-3d</id><content type="html" xml:base="https://alzobaer.github.io/posts/2026/07/how-a-computer-sees-a-plant-in-3d/"><![CDATA[<p>In the <a href="/posts/2026/07/what-is-plant-phenotyping/">previous post</a>
I described the problem with measuring plants by hand: it does not scale, it is
inconsistent, and the most accurate methods destroy the plant. The obvious way
out is to photograph the plant instead and measure the photographs.</p>

<p>But a photograph is flat. A plant is not. So how do you get from one to the
other?</p>

<h2 id="two-eyes-one-distance">Two eyes, one distance</h2>

<p>Start with something you already do without thinking. Hold a finger up in front
of your face and close one eye, then the other. Your finger appears to jump
sideways against the background.</p>

<p>That jump is the whole idea.</p>

<p>Your two eyes see the world from positions about six centimetres apart, so each
one gets a slightly different image. Near objects shift a lot between those two
views; distant objects barely shift at all. Your brain reads the size of the
shift and turns it into a sense of depth.</p>

<p>A computer does the same trick, with one important relaxation: the two views do
not have to arrive at the same instant, and they do not have to come from a
fixed pair of eyes. One camera, moved to a new position, gives you the second
view just as well.</p>

<h2 id="walk-around-the-plant">Walk around the plant</h2>

<p>So the recipe is: take many photographs of the plant from many positions,
walking around it as you go.</p>

<figure>
  <img src="/images/blog/photos-to-3d.svg" alt="Three stages: a camera photographs a plant from five positions around it; the same feature points are matched between two overlapping photos; the matches become a 3D cloud of points." />
  <figcaption>The pipeline in three moves. Photograph from many positions, find
  the points that appear in more than one photo, and let the geometry of those
  repeated points fix where everything sits in space.</figcaption>
</figure>

<p>Now the software looks for <strong>features</strong> — small, distinctive patches it can
recognise again in another photo. The tip of a leaf, a notch on a stem, a
speckle of texture on the soil. Anything visually unusual enough to be picked
out twice.</p>

<p>Then it plays matching. This patch here, in photo 12 — is it the same physical
speck as that patch there, in photo 13? Do this across thousands of features and
hundreds of photos, and something remarkable falls out.</p>

<p>Each matched feature imposes a constraint. If this speck appears <em>here</em> in one
photo and <em>there</em> in another, then the two cameras must have been in particular
positions relative to each other and to the speck — otherwise the numbers do not
add up. Pile up enough constraints and only one arrangement satisfies them all.
The software solves for that arrangement, recovering <strong>where every photo was
taken from</strong> and <strong>where every speck sits in space</strong>, simultaneously.</p>

<p>This is <strong>Structure-from-Motion</strong>: structure, recovered from the motion of the
camera. The output is a <em>point cloud</em> — thousands of dots floating in 3D, each
one a speck the software was confident about, together tracing the shape of the
plant.</p>

<h2 id="the-catch">The catch</h2>

<p>Here is the part that surprises people, and it is the reason my research exists.</p>

<p>That reconstruction is faithful in every respect but one. The proportions are
right, the shape is right, the geometry is right. The <strong>size</strong> is not
determined.</p>

<p>Think about why. Every constraint in the process came from comparing photos to
each other. Nothing in the process ever compared a photo to a ruler. A large
plant photographed from far away and a small plant photographed from close up
produce <em>identical</em> images — so nothing in the images can distinguish them.</p>

<p>The reconstruction therefore comes out in arbitrary units. It is a perfect
model of the plant at an unknown scale, and “unknown” means it can land
differently every time you rebuild. Same plant, Tuesday and Friday, two
different scales — and any measurement in centimetres is meaningless until you
pin that scale down.</p>

<p>The usual answer is to put an object of known size in the scene, like a
chequerboard target, and let the software calibrate against it. That works. It
also means someone has to place and maintain that target in a working
greenhouse, every session, forever.</p>

<p>The alternative is to stop needing the scale at all. That is what the next post
is about.</p>

<hr />

<p><em>Next in this series: what a Gaussian Splat is, and why it suits a leafy plant
better than a mesh.</em></p>]]></content><author><name>AL Zobaer</name><email>zobaer.al.24@shizuoka.ac.jp</email></author><category term="basics" /><category term="3d-reconstruction" /><category term="phenotyping" /><summary type="html"><![CDATA[Walk around a plant with a camera and you can rebuild it in three dimensions. Here is how that actually works — and what it quietly fails to tell you.]]></summary></entry><entry xml:lang="bn"><title type="html">প্ল্যান্ট ফেনোটাইপিং কী?</title><link href="https://alzobaer.github.io/bn/posts/2026/07/what-is-plant-phenotyping/" rel="alternate" type="text/html" title="প্ল্যান্ট ফেনোটাইপিং কী?" /><published>2026-07-20T00:00:00+00:00</published><updated>2026-07-20T00:00:00+00:00</updated><id>https://alzobaer.github.io/bn/posts/2026/07/what-is-plant-phenotyping-bn</id><content type="html" xml:base="https://alzobaer.github.io/bn/posts/2026/07/what-is-plant-phenotyping/"><![CDATA[<p>গ্রিনহাউসে টমেটো চাষ করলে আপনি নিশ্চয়ই লক্ষ্য করেছেন — একই প্যাকেটের বীজ, একই
দিনে লাগানো, অথচ দুটি গাছ দেখতে সম্পূর্ণ আলাদা হতে পারে। একটি লম্বা আর সরু,
অন্যটি ছোট কিন্তু ফলে ভারী। জিন এক, ফলাফল ভিন্ন।</p>

<p>এই ফারাকটাই ফেনোটাইপিংয়ের বিষয়।</p>

<h2 id="জিনোটাইপ-ও-ফেনোটাইপ">জিনোটাইপ ও ফেনোটাইপ</h2>

<p>গাছের <strong>জিনোটাইপ</strong> হলো তার জিনগত সংকেত — বীজেই নির্ধারিত, প্রতিটি কোষে অভিন্ন।
আর <strong>ফেনোটাইপ</strong> হলো গাছটি আসলে যা হয়ে ওঠে: কতটা লম্বা হলো, কয়টি পাতা মেলল,
সেই পাতা কতটুকু আলো ধরল, কখন ফল ধরল, ঠান্ডা রাত বা শুকনো সপ্তাহে কেমন সাড়া দিল।</p>

<figure>
  <img src="/images/blog/genotype-environment-phenotype.svg" alt="চিত্র: জিনোটাইপ যোগ পরিবেশ সমান ফেনোটাইপ।" />
  <figcaption>একই প্যাকেটের দুটি বীজের জিনোটাইপ এক। কিন্তু তারা কী হয়ে ওঠে, তা
  নির্ভর করে এরপর তাদের সঙ্গে যা যা ঘটে তার উপর।</figcaption>
</figure>

<p>ফেনোটাইপ মানে জিনোটাইপ <em>যোগ গাছটির সঙ্গে ঘটে যাওয়া সবকিছু</em>। তাপমাত্রা, আলো,
পানি, পুষ্টি, ছাঁটাই, রোগের চাপ — সব এসে জমা হয় ফেনোটাইপে।</p>

<p>এটি গুরুত্বপূর্ণ, কারণ ফেনোটাইপই সেই অংশ যেখানে চাষি প্রভাব ফেলতে পারেন। বীজ
একবার মাটিতে গেলে তা বদলানো যায় না, কিন্তু আবহাওয়া, সেচ আর ছাঁটাইয়ের সময়সূচি
বদলানো যায়। সেই সিদ্ধান্তগুলো কাজ করছে কি না জানতে হলে গাছটিকে মাপতে হবে।</p>

<h2 id="কী-কী-মাপা-হয়">কী কী মাপা হয়</h2>

<p>ফেনোটাইপিং মানে <strong>বৈশিষ্ট্য</strong> (trait) মাপা — গাছের পর্যবেক্ষণযোগ্য, সংখ্যায়
প্রকাশযোগ্য ধর্ম। গ্রিনহাউসে যেগুলো গুরুত্বপূর্ণ:</p>

<ul>
  <li><strong>উচ্চতা</strong> — বৃদ্ধির হারের সরাসরি পাঠ।</li>
  <li><strong>পাতার ক্ষেত্রফল</strong> — সালোকসংশ্লেষণের জন্য কতটা পৃষ্ঠতল আছে।</li>
  <li><strong>কাণ্ডের ব্যাস</strong> — সবলতা ও ভার বহনক্ষমতার ইঙ্গিত।</li>
  <li><strong>জৈববস্তু (biomass)</strong> — মোট সঞ্চিত বৃদ্ধি।</li>
  <li><strong>ফলের সংখ্যা ও আকার</strong> — যেটি আসলে বিক্রি হয়।</li>
</ul>

<p>একবার মাপলে পাওয়া যায় একটি স্থিরচিত্র। কিন্তু পুরো মৌসুম জুড়ে কয়েক দিন পরপর
মাপলে পাওয়া যায় <strong>বৃদ্ধির বক্ররেখা</strong>, যা অনেক বেশি কাজের: এটি শুধু বলে না গাছ
এখন কোথায়, বলে দেয় কোন দিকে যাচ্ছে — এবং গত সপ্তাহে সেচের পরিবর্তনে আদৌ কিছু
হলো কি না।</p>

<h2 id="সমস্যাটা-কোথায়">সমস্যাটা কোথায়</h2>

<p>আমার গবেষণার মূল প্রেরণা এখানেই: এই সংখ্যাগুলো সংগ্রহের চিরাচরিত উপায় হলো
একজন মানুষ ফিতা, স্কেল আর খাতা হাতে গ্রিনহাউসে ঢুকবেন।</p>

<p>এই পদ্ধতির তিনটি দুর্বলতা আছে।</p>

<p><strong>এটি বড় পরিসরে চলে না।</strong> একটি গাছ যত্ন করে মাপতে কয়েক মিনিট লাগে। একটি
বাণিজ্যিক গ্রিনহাউসে গাছ থাকে হাজারে। তাই সব গাছ কেউ মাপে না — কয়েকটি নমুনা
নিয়ে ধরে নেওয়া হয় বাকিরাও এমনই।</p>

<p><strong>এটি অসঙ্গত।</strong> ফলের ভারে নুয়ে পড়া গাছের “চূড়া” ঠিক কোথায়? দুজন মানুষ দুরকম
উত্তর দেবেন, এমনকি একই মানুষ শুক্রবার বিকেলে অন্যরকম মাপবেন। বৃদ্ধির হারে যখন
সামান্য পরিবর্তন খুঁজছেন, তখন এই মাপজোকের গোলমালই আসল সংকেত ঢেকে দেয়।</p>

<p><strong>এটি ধ্বংসাত্মক।</strong> জৈববস্তু বা পাতার ক্ষেত্রফল মাপার সবচেয়ে নির্ভরযোগ্য উপায়
হলো গাছটি কেটে, শুকিয়ে, ওজন করা। একটি চমৎকার পরিমাপ পাওয়া যায় — আর গাছটি
থাকে না। ফলে একই গাছকে সময়ের সঙ্গে বেড়ে উঠতে দেখা আর সম্ভব হয় না।</p>

<p>শেষ বিন্দুটিই সবচেয়ে তীক্ষ্ণ। ফসল বিজ্ঞানের সবচেয়ে আকর্ষণীয় প্রশ্নগুলো
<em>পরিবর্তন</em> নিয়ে — দিনে দিনে, সপ্তাহে সপ্তাহে গাছ কেমন সাড়া দেয় — অথচ সবচেয়ে
নিখুঁত চিরাচরিত পদ্ধতিগুলো ঠিক সেই জিনিসটিই নষ্ট করে ফেলে যা আপনি অনুসরণ করতে
চেয়েছিলেন।</p>

<h2 id="বিকল্প-পথ">বিকল্প পথ</h2>

<p>সহজ ভাবনাটি হলো: স্কেলের বদলে ক্যামেরা। ছবি তুলুন, গাছটিকে ত্রিমাত্রিকভাবে
পুনর্গঠন করুন, আর গাছের বদলে সেই পুনর্গঠনটিকে মাপুন। কিছুই কাটা পড়ে না, একই
গাছ প্রতিদিন মাপা যায়, আর হাঁটাহাঁটির কাজটা একটি রোবটই করতে পারে।</p>

<p>মোটামুটি এটিই আমার গবেষণা করে, এবং ভাবনাটি সঠিক। কিন্তু এতে একটি নতুন সমস্যা
আসে, যা চেষ্টা না করলে চোখে পড়ে না: সাধারণ ছবি থেকে তৈরি ত্রিমাত্রিক পুনর্গঠন
গাছের <strong>আকৃতি</strong> নিখুঁতভাবে ফিরিয়ে আনে, কিন্তু তার <strong>আকার</strong> থাকে অনিশ্চিত।
একই গাছ মঙ্গলবার আর শুক্রবার পুনর্গঠন করলে দুটি মডেল ভিন্ন স্কেলে আসতে পারে —
গাছ বদলেছে বলে নয়, বরং পুনর্গঠনের ভেতরে “এক সেন্টিমিটার কতটুকু” তার কোনো
ধারণাই নেই বলে।</p>

<p>অর্থাৎ প্রতিটি সেশনের মাঝে পরিমাপ সরে যায়, আর আপনি আবার সেই গোলমালে ফিরে যান
যা আসল সংকেতকে ঢেকে দেয়।</p>

<figure>
  <img src="/images/blog/scale-ambiguity.svg" alt="একই গাছের দুটি ছবি ভিন্ন আকারে, দুটিরই উচ্চতা অজানা সেন্টিমিটারে চিহ্নিত।" />
  <figcaption>এই দুটিই একই ছবিগুচ্ছের সঙ্গে সঙ্গতিপূর্ণ। আকৃতি নিখুঁতভাবে ফিরে
  এসেছে; আকার কেবল অনুমান। মঙ্গলবার আর শুক্রবার পুনর্গঠন করলে ভিন্ন উত্তর আসতে
  পারে — গাছ বদলেছে বলে নয়, বরং সাধারণ ছবিতে "এক সেন্টিমিটার" বলে কিছু
  সংজ্ঞায়িত নেই বলে।</figcaption>
</figure>

<p>এই সমস্যা — এবং তার সমাধান — নিয়েই পরের কয়েকটি লেখা।</p>

<hr />

<p><em>আমার গবেষণার ভাবনাগুলো নিয়ে পরিচিতিমূলক এই ধারাবাহিকের এটি প্রথম লেখা।
পরের পর্ব: সাধারণ ছবি থেকে কম্পিউটার কীভাবে গাছের ত্রিমাত্রিক মডেল বানায়।</em></p>]]></content><author><name>AL Zobaer</name><email>zobaer.al.24@shizuoka.ac.jp</email></author><category term="phenotyping" /><category term="basics" /><category term="precision-agriculture" /><summary type="html"><![CDATA[গাছের জিনের সঙ্গে তার প্রকৃত বেড়ে ওঠার পার্থক্য — এবং দ্বিতীয়টি মাপা কেন এত কঠিন।]]></summary></entry></feed>